Flows
The capabilities mentioned on this page must be registered with the EPOS Capabilities API prior to initiating a Pay At Table flow, learn more here.
- No locking flow
- Locking flow
The following diagram demonstrates how the Pay at Table product will interact with Dojo and the POS system for settling a table when initiated by a Dojo product, such as a Dojo card terminal or QR Pay:
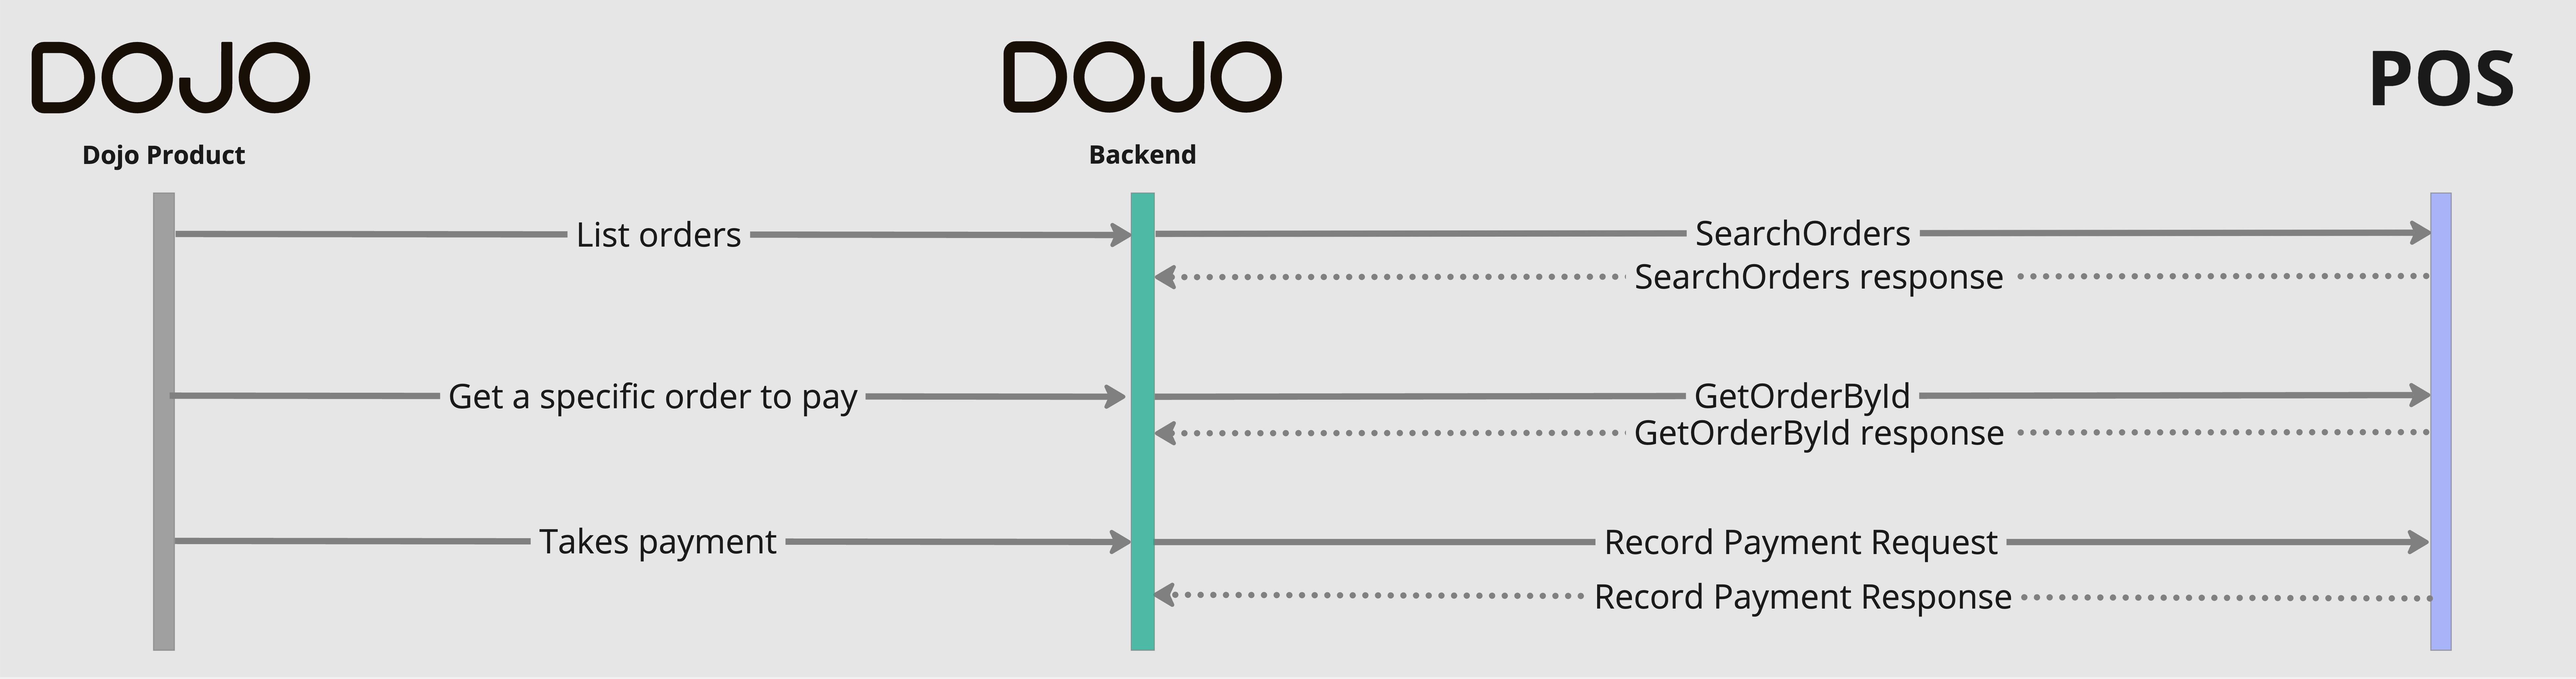
Flow diagram: Pat Flow Diagram2
sequenceDiagram
    participant DP as Dojo Product
    participant B as Dojo Backend
    participant P as POS

    DP->>B: List orders
    B->>P: SearchOrders
    P-->>B: SearchOrders response
    DP->>B: Get a specific order to pay
    B->>P: GetOrderById
    P-->>B: GetOrderById response
    DP->>B: Takes payment
    B->>P: Record Payment Request
    P-->>B: Record Payment Response
The following diagram demonstrates how the Pay at Table product will interact with Dojo and the POS system for settling a table when initiated by a Dojo card terminal, and when order locking is enforced by the POS during the payment flow.

Flow diagram: Pat Flow Diagram1
sequenceDiagram
    participant T as Dojo Go Terminal
    participant B as Dojo Backend
    participant P as POS

    T->>B: List orders
    B->>P: SearchOrders
    P-->>B: SearchOrders response
    T->>B: Get a specific order to pay
    B->>P: GetOrderById*
    P-->>B: GetOrderById response
    B->>P: Lock an EPOS Order
    P-->>B: Lock an EPOS Order response
    T->>B: Takes payment
    B->>P: Record Payment Request**
    P-->>B: Record Payment response
    B->>P: Unlock an EPOS Order
    P-->>B: Unlock an EPOS Order response

    Note over T,P: *GetOrderById may be called during flow by certain products, or to print an EPOS bill.
    Note over T,P: **Multiple Record Payment requests may occur, such as in the instance where a bill is split between several payees.
Note: Support of the "no locking flow" detailed above is considered mandatory, while support of the "Locking flow" is only considered mandatory if the CreateOrderLock, ExtendOrderLock and DeleteOrderLock capabilities are registered. If these capabilities are registered, the POS is expected to restrict order access and changes while an order lock is requested.
Step 1: List orders via SearchOrders
Main page: Orders
The initial step in the Pay at Table flow involes the waiter opening the "Integration" screen on the payment device, if configured (on the device) the waiter will
be asked to input their waiter id which will be included in the SearchOrders request to the POS system. If the user is a customer and initiating via another product, such as QR to Pay, the request will include a tableId field to filter the orders by.
When initiated from a Dojo card machine, the orders returned via the SearchOrders request are then presented on the payment device in a list for the waiter to select from, the name presented on the device for each order is determined by the following logic (first condition to match):
displayNamefield if populated in the OrdertableIdfield if populated in the Order- The mandatory
idfield of the Order - Otherwise the
idfield of an Order is used
Exceptions
- In cases where the names of orders to be presented on the payment device have duplicates a suffix of
"- $number"will be added to the name e.g.Table1 - 1. - Dojo payment devices have a 24-character limit for order names. Names longer than this limit will be truncated. Note:
We will only request payable orders, by setting the payableOnly parameter to true. Therefore only orders which can be paid for will be
presented on the payment device, allowing some orders to be hidden if they're being edited on the POS or have already been fully paid off.
Step 2: Get a specific order to pay via or GetOrderById or CreateOrderLock
Main page: Orders
The next step in the Pay at Table flow is triggered when a user selects an Order. This may materialise as either:
GetOrderById
- A waiter choosing from the list of orders (from the previous step) or a customer selecting via the QR to Pay flow, which will trigger a GetOrderById to retrieve an up-to-date representation of the order details. This step ensures that the most recent version of the order is presented on the payment screen before any payment is taken.
CreateOrderLock
POST REST /v1/orders/{orderId}/lock
- A waiter choosing from the list of orders (from the previous step), which will trigger a CreateOrderLock (which includes their
waiterIdif given) to fetch the latest and full state of the order from the POS system using theidfield. This will include a uniquelockIdand expects the POS to "lock" the table to prevent further changes while payment is being made.
Note: Both methods of retrieving order data may be invoked during the same flow, such as in the instance where an order is locked and then GetOrderById is used to retrieve a POS receipt for printing, so if the POS is enforcing order locking it must still accept and respond to GetOrderById requests.
Step 3: Takes payment, payment event sent via Record Payment request
POST REST /v1/orders/{orderId}/record-payment
Main page: Record Payments
The waiter can now take the payments for this order, and depending on how the customer chooses to pay,
there may be a single payment or multiple for the order (split payment or pay by items).
As part of the payment process, a RecordOrderPaymentById will be sent to the POS for each individual payment, this will include the orderId as well as other information such as the paymentIntentId - this ID should be recorded by the POS to facilitate payment tracking and refunds.
If a waiter ID was provided on the payment device,
an entry with the key waiterId will be included in the metadata on those created payment intents.
The POS should respond to this request with a 200 response to indicate that the payment has been acknowledged and recorded. The POS should also respond with the current order "status" to show any changes that may have occurred to this attribute.
If the payment cannot be recorded, such as in the event of a mismatching value being submitted in the RecordOrderPaymentById request, the POS should reject the request with a 409 error and the relevant errorType, in most cases this will be Conflict. This will trigger a payment reversal on the payment device or customer app and prompt the user to reattempt the payment.
Note: If the order is initiated via a Dojo product such as QR to Pay then this may be the final step in the payment flow.
Tracking Payment Intents through Events
As an additional measure, the POS can also track the status of Payment Intents by subscribing to the payment_intent.status_updated via Webhook if using REST, or by registering the HandleEvent:payment_intent.status_updated capability if using Websockets.
In order to get the full information for a payment after receiving a RecordOrderPaymentById, the POS system can lookup the payment intent via the Dojo API: this can be useful when retrieving receipt data, for example.
To determine which order on the POS system a payment intent belongs to, the POS system should look at the orderDetails.externalId field on the
payment intent. This field will be set to the id field from the order returned by the POS in the previous steps.
Note: Events are delivered with an At least once guarantee, so the POS will need to handle receiving duplicate events for the same payment intent.
Step 4: Order is unlocked
DELETE REST /v1/orders/{orderId}/locks/{lockId}
Main page: Orders
If order locking is enforced, then the final step of the Pay at Table flow is for the order to be unlocked: Dojo will request this by sending a DeleteOrderLock containing the relevant orderId and lockId. This request expects the POS to allow further actions and updates to the order if it remains open.