Payment intent
Learn how to use payment intents and their lifecycle.
We offer a full range of online payment integrations, such as our prebuilt checkout page, payment links and components. Ultimately, these are all based on payment intents.
How payment intents work
The payment intent is the central entity of the Dojo API, and the first thing any integration starts with. It contains payment details such as amount and currency, payment methods, and customer billing and shipping addresses. You can configure the payment intent object in various ways to suit your payment scenario.
To create a payment when a customer purchases something from you, you create a payment intent using the POST /payment-intents endpoint and provide details of the purchase. We recommend using one payment intent per purchase. If the payment process was interrupted, you can resume it and reuse the same payment intent instead of creating a new one.
Depending on how you want to capture payments, you need to choose one of the capture modes:
-
Auto: by default, payment intents are captured automatically without delay.Use this capture mode if you need to get paid immediately. This is ideal for accepting payments on your website or mobile app.
-
Manual: you need to explicitly request each payment intent is captured by making a request POST /payment-intents/{paymentIntentId}/captures. If the payment intent isn't captured within 7 days, it will be automatically reversed.Use this capture mode if you want to hold money on the customer’s card to collect them later or reverse it back to your customer. It's perfect if you’re a business that takes deposits or tabs, like a hotel or bar.
Payment intents will progress through some combination of the statuses listed in the diagrams below.
- Auto
- Manual

Flow diagram: Payment Intent Flow Auto
stateDiagram-v2
    state "Created" as created
    state "Captured" as captured
    state "Canceled" as canceled
    state "Reversed" as reversed
    state "Refunded" as refunded

    [*] --> created: POST /payment-intents
    created --> canceled: DELETE /payment-intents/{paymentIntentId}
    created --> captured: The customer fills the card details
    captured --> reversed: POST /payment-intents/{paymentIntentId}/reversal
    captured --> refunded: POST /payment-intents/{paymentIntentId}/refunds
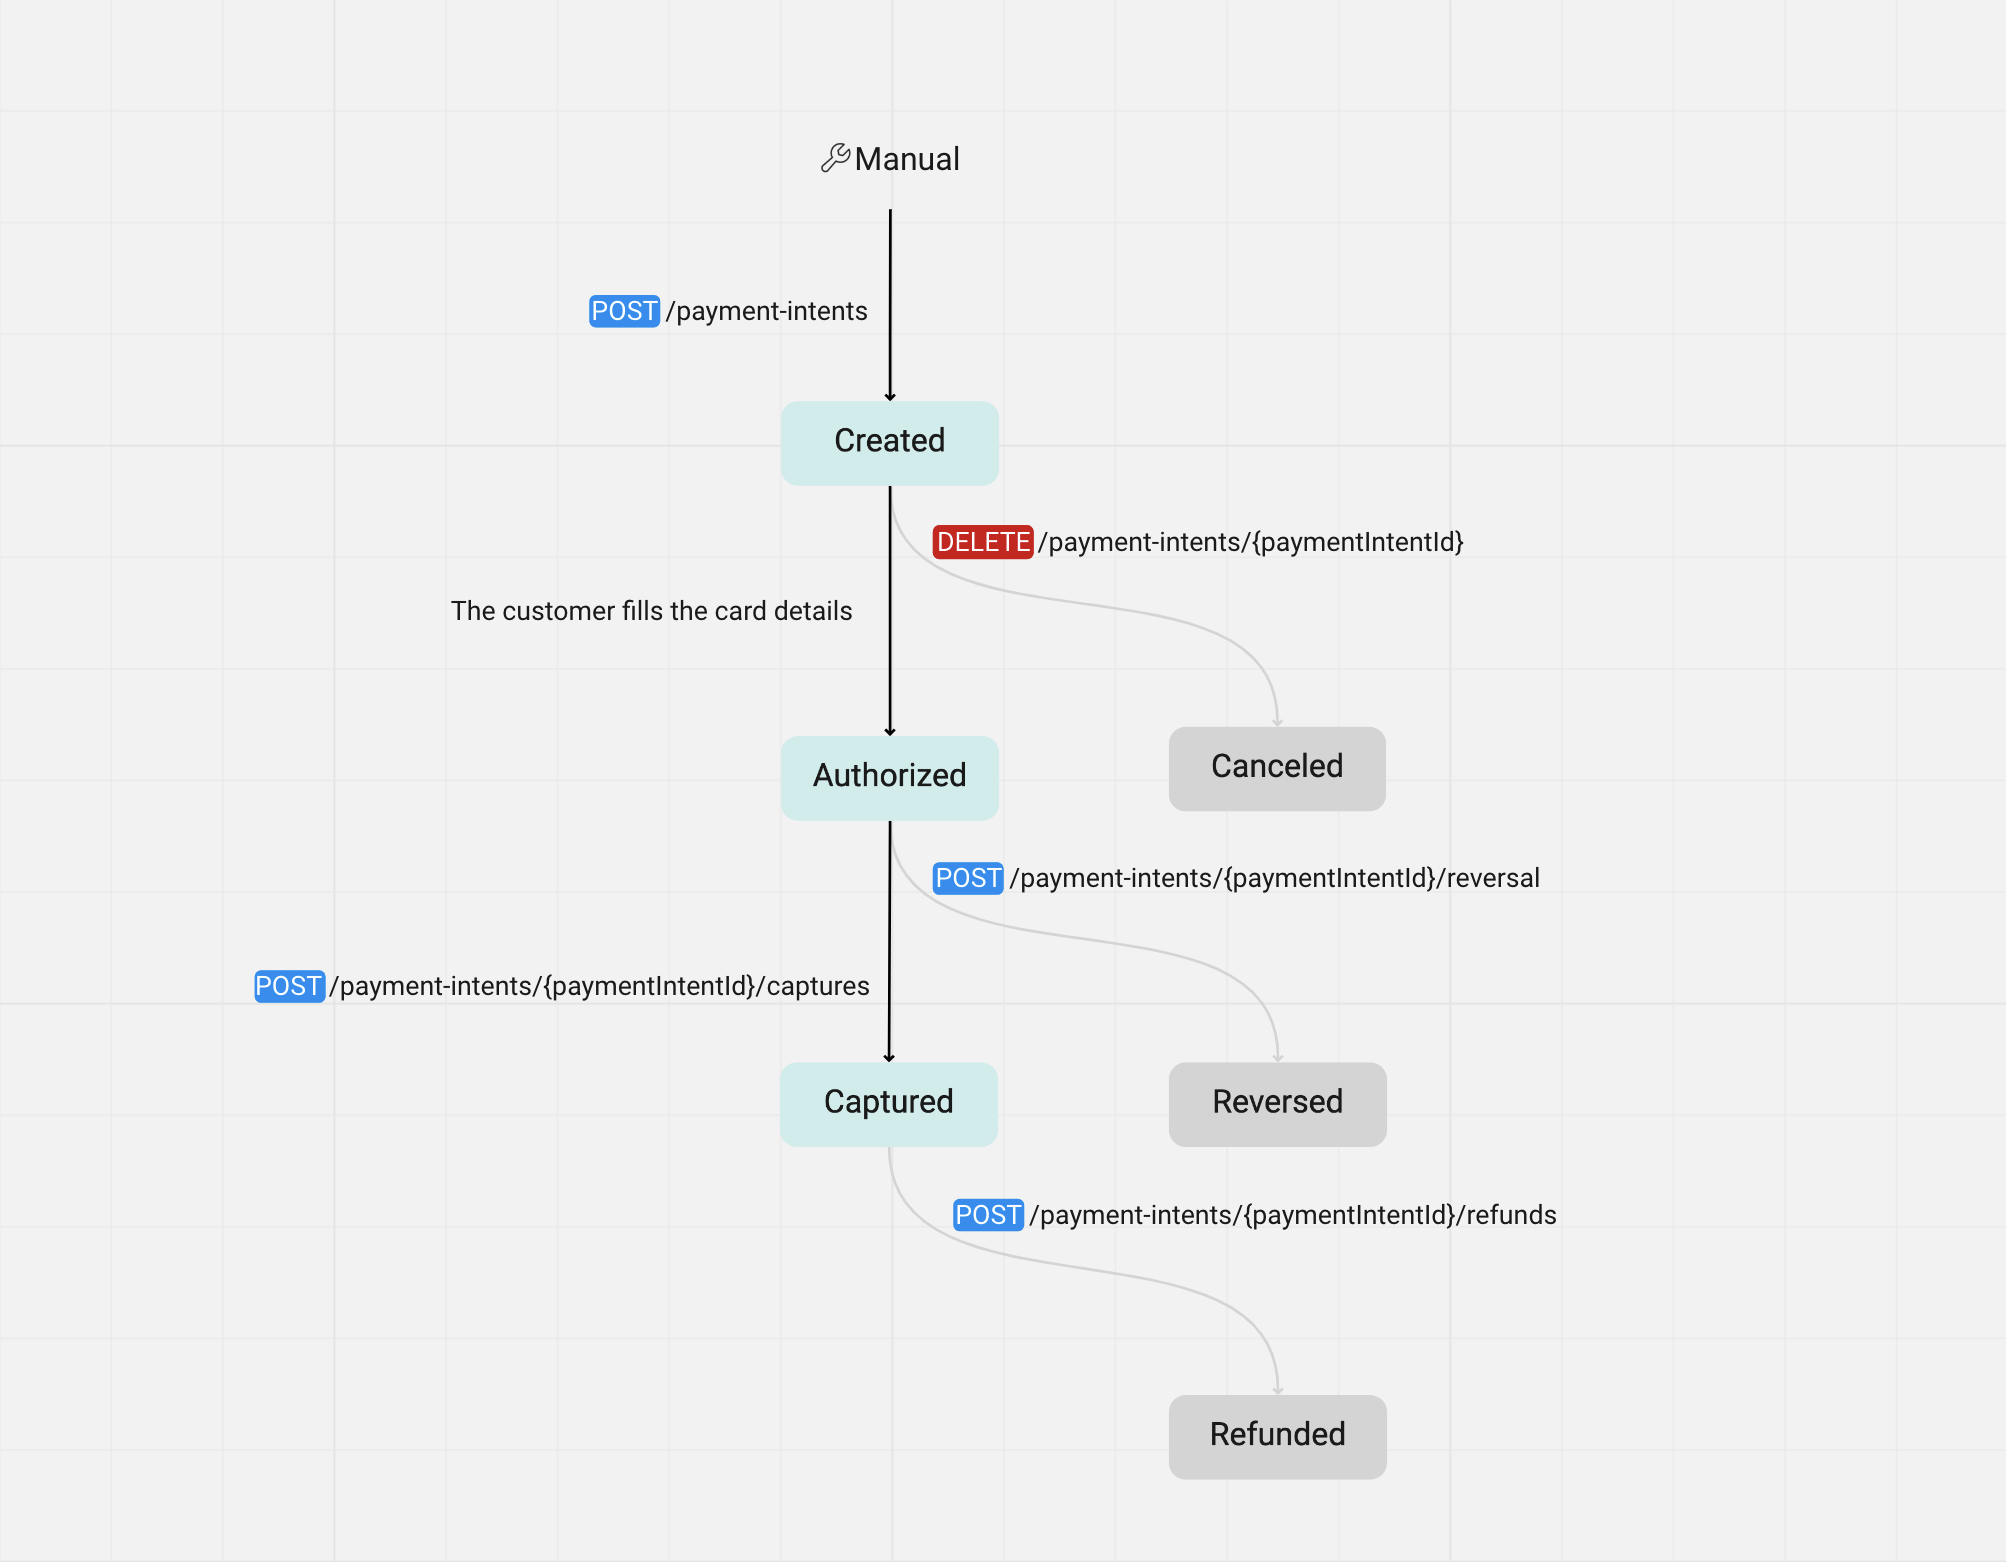
Flow diagram: Payment Intent Flow Manual
stateDiagram-v2
    state "Created" as created
    state "Authorized" as authorized
    state "Captured" as captured
    state "Canceled" as canceled
    state "Reversed" as reversed
    state "Refunded" as refunded

    [*] --> created: POST /payment-intents
    created --> canceled: DELETE /payment-intents/{paymentIntentId}
    created --> authorized: The customer fills the card details
    authorized --> reversed: POST /payment-intents/{paymentIntentId}/reversal
    authorized --> captured: POST /payment-intents/{paymentIntentId}/captures
    captured --> refunded: POST /payment-intents/{paymentIntentId}/refunds
Create a payment intent
To create a payment intent, use the endpoint below:
POST /payment-intents
By default, it will be created with captureMode: Auto.
To create a payment intent with captureMode: Manual, include this field in your request.
For the full API specification, see the API reference.
Configurable fields
You can include configurable fields when creating your payment intent. These fields can be changed later, while the payment intent is active, but before it is captured. In the next example, both the payment amount and the tip amount can be changed:
"config": {
    "payment": {
        "customAmountAllowed": true,
        "tipsAllowed": true
    }
}
Request example
- Auto
- Manual
The next example shows how to create a payment intent with captureMode: Auto.
- cURL
- PowerShell
- Python
- C#
- PHP
# The sandbox API key passed in 'authorization' is public.
# Don't submit any personally identifiable information in any requests made with this key.
# Sign in to developer.dojo.tech to create your own private sandbox key and use that instead
# for secure testing.

curl -v --request POST \
  --url https://api.dojo.tech/payment-intents \
  --header 'Content-Type: application/json' \
  --header 'Authorization: Basic sk_sandbox_c8oLGaI__msxsXbpBDpdtwJEz_eIhfQoKHmedqgZPCdBx59zpKZLSk8OPLT0cZolbeuYJSBvzDVVsYvtpo5RkQ' \
  --header 'Version: 2024-02-05' \
  --data '{
    "amount": {
        "value": 1000,
        "currencyCode": "GBP"
      },
      "reference": "Order-0001",
      "paymentMethods": [
        "Card",
        "Wallet"
      ]
    }'
# The sandbox API key passed in '$publicSandboxKey' is public.
# Don't submit any personally identifiable information in any requests made with this key.
# Sign in to developer.dojo.tech to create your own private sandbox key and use that instead
# for secure testing.

$publicSandboxKey = "sk_sandbox_c8oLGaI__msxsXbpBDpdtwJEz_eIhfQoKHmedqgZPCdBx59zpKZLSk8OPLT0cZolbeuYJSBvzDVVsYvtpo5RkQ"

Invoke-WebRequest `
    -Uri 'https://api.dojo.tech/payment-intents' `
    -Method POST `
    -Headers @{
        "version" = "2024-02-05"
        "Authorization" = "Basic $publicSandboxKey"
    } `
    -ContentType 'application/json' `
    -Body '{
        "amount": {
            "value": 1000,
            "currencyCode": "GBP"
        },
        "reference": "Order 234",
        "description": "Demo payment intent"
    }'
conn = http.client.HTTPSConnection("api.dojo.tech")
payload = json.dumps({
    "amount": {
        "value": 1000,
        "currencyCode": "GBP"
    },
    "reference": "Order 245"
})
headers = {
    'Content-Type': "application/json",
    'Version': "2024-02-05",
    'Authorization': "Basic sk_sandbox_c8oLGaI__msxsXbpBDpdtwJEz_eIhfQoKHmedqgZPCdBx59zpKZLSk8OPLT0cZolbeuYJSBvzDVVsYvtpo5RkQ" # <-- Change to your secret key
}
conn.request("POST", "/payment-intents", payload, headers)
res = conn.getresponse()
// The sandbox API key passed in 'ApiKeyClientAuthorization' is public.
// Don't submit any personally identifiable information in any requests made with this key.
// Sign in to developer.dojo.tech to create your own private sandbox key and use that instead
// for secure testing.

var paymentIntentsClient = new PaymentIntentsClient(new HttpClient(), new ApiKeyClientAuthorization("sk_sandbox_c8oLGaI__msxsXbpBDpdtwJEz_eIhfQoKHmedqgZPCdBx59zpKZLSk8OPLT0cZolbeuYJSBvzDVVsYvtpo5RkQ"));
var result = await paymentIntentsClient.CreatePaymentIntentAsync(new CreatePaymentIntentRequest
{
    Amount = new()
    {
        Value = 1000,
        CurrencyCode = "GBP"
    },
    Description = "Demo payment intent",
    Reference = "Order - 1"
});
<?php
// The sandbox API key used in this example is public.
// Don't submit any personally identifiable information in any requests made with this key.
// Sign in to developer.dojo.tech to create your own private sandbox key and use that instead
// for secure testing.

namespace Test;
require_once "vendor/autoload.php";

use Dojo_PHP\ApiFactory;
use Dojo_PHP\Model\CreatePaymentIntentRequest;
use Dojo_PHP\Model\Money;

$apiKey = "sk_sandbox_c8oLGaI__msxsXbpBDpdtwJEz_eIhfQoKHmedqgZPCdBx59zpKZLSk8OPLT0cZolbeuYJSBvzDVVsYvtpo5RkQ";
$apiPaymentIntent = ApiFactory::createPaymentIntentApi($apiKey);

$req = new CreatePaymentIntentRequest();
$req->setDescription("Demo payment intent");
$req->setReference("Order - 1");

$money = new Money();
$money->setValue(1000);
$money->setCurrencyCode("GBP");

$req->setAmount($money);

$pi = $apiPaymentIntent->paymentIntentsCreatePaymentIntent(\Dojo_PHP\API_VERSION, $req);
The next example shows how to create a payment intent with captureMode: Manual.
- cURL
- PowerShell
- Python
- C#
- PHP
# The sandbox API key passed in 'authorization' is public.
# Don’t submit any personally identifiable information in any requests made with this key.
# Sign in to developer.dojo.tech to create your own private sandbox key and use that instead
# for secure testing.

curl -v --request POST \
    --url https://api.dojo.tech/payment-intents \
    --header 'Content-Type: application/json' \
    --header 'Authorization: Basic sk_sandbox_c8oLGaI__msxsXbpBDpdtwJEz_eIhfQoKHmedqgZPCdBx59zpKZLSk8OPLT0cZolbeuYJSBvzDVVsYvtpo5RkQ' \
    --header 'Version: 2022-07-04' \
    --data '{
        "captureMode": "Manual",
        "autoExpireAt": "2023-12-01T00:00:00",
        "autoExpireAction": "Release",
        "amount": {
            "value": 1000,
            "currencyCode": "GBP"
        },
        "reference": "Order-0001"
    }'
# The sandbox API key passed in '$publicSandboxKey' is public.
# Don't submit any personally identifiable information in any requests made with this key.
# Sign in to developer.dojo.tech to create your own private sandbox key and use that instead
# for secure testing.

$publicSandboxKey = "sk_sandbox_c8oLGaI__msxsXbpBDpdtwJEz_eIhfQoKHmedqgZPCdBx59zpKZLSk8OPLT0cZolbeuYJSBvzDVVsYvtpo5RkQ"

Invoke-WebRequest `
    -Uri 'https://api.dojo.tech/payment-intents' `
    -Method POST `
    -Headers @{
        "version" = "2022-07-04"
        "Authorization" = "Basic $publicSandboxKey"
    } `
    -ContentType 'application/json' `
    -Body '{
        "amount": {
            "value": 1000,
            "currencyCode": "GBP"
        },
        "autoExpireAt": "2023-12-01T00:00:00",
        "autoExpireAction": "Release",
        "reference": "Order 234",
        "description": "Demo payment intent",
        "captureMode": "Manual"
    }'
conn = http.client.HTTPSConnection("api.dojo.tech")

payload = json.dumps({
    "amount": {
        "value": 1000,
        "currencyCode": "GBP"
    },
    "autoExpireAt": "2023-12-01T00:00:00",
    "autoExpireAction": "Release",
    "reference": "Order 234",
    "captureMode": "Manual"
})

headers = {
    'Version': '2022-07-04',
    'Content-Type': 'application/json',
    'Accept': 'application/json',
    'Authorization': 'Basic sk_sandbox_c8oLGaI__msxsXbpBDpdtwJEz_eIhfQoKHmedqgZPCdBx59zpKZLSk8OPLT0cZolbeuYJSBvzDVVsYvtpo5RkQ'
}

conn.request("POST", "/payment-intents/", payload, headers)
res = conn.getresponse()
data = res.read()
// The sandbox API key passed in 'ApiKeyClientAuthorization' is public.
// Don’t submit any personally identifiable information in any requests made with this key.
// Sign in to developer.dojo.tech to create your own private sandbox key and use that instead
// for secure testing.

var paymentIntentsClient = new PaymentIntentsClient(new HttpClient(), new ApiKeyClientAuthorization("sk_sandbox_c8oLGaI__msxsXbpBDpdtwJEz_eIhfQoKHmedqgZPCdBx59zpKZLSk8OPLT0cZolbeuYJSBvzDVVsYvtpo5RkQ"));
var result = await paymentIntentsClient.CreatePaymentIntentAsync(new CreatePaymentIntentRequest
{
    Amount = new()
    {
        Value = 1000,
        CurrencyCode = "GBP"
    },
    Description = "Demo payment intent",
    Reference = "Order - 1",
    CaptureMode = CaptureMode.Manual,
    AutoExpireAt = DateTime.UtcNow.AddDays(7), // Dojo supports maximum 7 days.
    AutoExpireAction = AutoExpireAction.Release
});
<?php
// The sandbox API key used in this example is public.
// Don't submit any personally identifiable information in any requests made with this key.
// Sign in to developer.dojo.tech to create your own private sandbox key and use that instead
// for secure testing.

namespace Test;
require_once "vendor/autoload.php";

use Dojo_PHP\ApiFactory;
use Dojo_PHP\Model\CreatePaymentIntentRequest;
use Dojo_PHP\Model\Money;
use Dojo_PHP\Model\CaptureMode;
use Dojo_PHP\Model\AutoExpireAction;

$apiKey = "sk_sandbox_c8oLGaI__msxsXbpBDpdtwJEz_eIhfQoKHmedqgZPCdBx59zpKZLSk8OPLT0cZolbeuYJSBvzDVVsYvtpo5RkQ";
$apiPaymentIntent = ApiFactory::createPaymentIntentApi($apiKey);

$req = new CreatePaymentIntentRequest();
$req->setDescription("Demo payment intent");
$req->setReference("Order - 234");

$money = new Money();
$money->setValue(1000);
$money->setCurrencyCode("GBP");

$req->setAmount($money);

$req->setCaptureMode(CaptureMode::MANUAL);
$req->setAutoExpireAction(AutoExpireAction::RELEASE);
$req->setAutoExpireAt("2023-12-01T00:00:00");

$pi = $apiPaymentIntent->paymentIntentsCreatePaymentIntent(\Dojo_PHP\API_VERSION, $req);
Check payment intent status
Each payment intent transitions through several statuses throughout its lifetime. We recommend checking the status of your payment intent by subscribing to the notifications.
Also, you can check the status using the endpoint below:
GET /payment-intents/{paymentIntentId}
In your request, include:
paymentIntentId: identifies the payment intent you want to check.
For the full API specification, see the API reference.
Request example
The next example shows how to check the status of the payment intent.
- cURL
- PowerShell
- Python
- C#
- PHP
# The sandbox API key passed in 'authorization' is public.
# Don't submit any personally identifiable information in any requests made with this key.
# Sign in to developer.dojo.tech to create your own private sandbox key and use that instead
# for secure testing.

curl -v --request GET \
  --url https://api.dojo.tech/payment-intents/<paymentIntentId>\
  --header 'Content-Type: application/json' \
  --header 'Authorization: Basic <your_api_key>' \
  --header 'Version: 2024-02-05'
# The sandbox API key passed in '$publicSandboxKey' is public.
# Don't submit any personally identifiable information in any requests made with this key.
# Sign in to developer.dojo.tech to create your own private sandbox key and use that instead
# for secure testing.

$publicSandboxKey = "sk_sandbox_c8oLGaI__msxsXbpBDpdtwJEz_eIhfQoKHmedqgZPCdBx59zpKZLSk8OPLT0cZolbeuYJSBvzDVVsYvtpo5RkQ"

# Replace <payment_intent_id> with ID of payment intent you want to cancel.
Invoke-WebRequest `
    -Uri 'https://api.dojo.tech/payment-intents/<paymentIntentId>' `
    -Method GET `
    -Headers @{
        "Version" = "2024-02-05"
        "Authorization" = "Basic $publicSandboxKey"
    }
# The sandbox API key passed in 'authorization' is public.
# Don't submit any personally identifiable information in any requests made with this key.
# Sign in to developer.dojo.tech to create your own private sandbox key and use that instead
# for secure testing.

import http.client
import json

conn = http.client.HTTPSConnection("api.dojo.tech")

headers = {
    'Version': "2024-02-05",
    'Authorization': "Basic <your_api_key>"
    }

conn.request("GET", f"/payment-intents/{paymentIntentId}", headers=headers)

res = conn.getresponse()
data = res.read()
resp_data = {}
resp_data['status'] = json.loads(data)["status"]

print(resp_data)

conn.close()
// The sandbox API key passed in 'ApiKeyClientAuthorization' is public.
// Don't submit any personally identifiable information in any requests made with this key.
// Sign in to developer.dojo.tech to create your own private sandbox key and use that instead
// for secure testing.

var paymentIntentsClient = new PaymentIntentsClient(new HttpClient(), new ApiKeyClientAuthorization("<your_api_key>"));
var result = await paymentIntentsClient.GetAsync("<paymentIntentId>");
Console.Write(result.Status);
<?php
// The sandbox API key used in this example is public.
// Don't submit any personally identifiable information in any requests made with this key.
// Sign in to developer.dojo.tech to create your own private sandbox key and use that instead
// for secure testing.

namespace Test;
require_once "vendor/autoload.php";

use Dojo_PHP\ApiFactory;

$apiKey = "<your_api_key>";
$api = ApiFactory::createPaymentIntentApi($apiKey);

$pi = $api->paymentIntentsGet("<paymentIntentId>", \Dojo_PHP\API_VERSION);
The response will return information about the payment intent and its status.
 API reference Learn about the API and integrate with API endpoints.
 Webhooks Subscribe to events to get notified of status changes in your payment intent.