Flows
The capabilities mentioned on this page must be registered with the EPOS Capabilities API prior to initiating an Order and Pay flow, learn more here.
- Order and Pay Flow
- Pay-only flow
The following diagram demonstrates how the Order and Pay product will interact with Dojo and the POS system for creating orders and completing payments:

Step-by-step: Order and Pay
Step 1: Customer creates order to Dojo
The first stage of the Order and Pay flow is triggered when a customer, having accessed a list of venue products using the Dojo Order and Pay interface, creates an order by adding one or more items to the basket and advancing to the payment screen.
Step 2: Dojo creates a Payment Intent and captures the payment
Main Page: Payment Intents
Once the order has been initiated via the Order and Pay interface, Dojo will pre-authorise the payment by creating a Payment Intent and initiating a checkout flow for the customer. This payment is to be captured once the POS has confirmed the order. This also generates a Payment Intent which can be used to recall payment details such as the authorization code, card type and receipt data upon payment completion.
Step 3: Dojo creates an order on the POS
POST REST /v1/orders
Main page: Orders
The next step in is for Dojo to create the customer order within the POS, using the CreateOrder capability. The request will contain fields such as item data, type of order and payment details, including the paymentIntentId. It may also contain any additional modifiers or discounts, for example, if specified.
The POS should respond to Dojo with a 200 response to confirm that this has been received and that the payment has been acknowledged and recorded, and the response should inlcude additional data such as the relevant status.
In any calls made from the POS to Dojo through the Dojo API, such as to retrieve the Payment Intent status, Dojo will refer to the POS "order ID" by externalId, this can be useful when retrieving payment details such as receipt data upon payment completion, for example.
Step 4: Dojo displays order status to customer
After receiving a successful response from the POS to the RecordOrderPayment request, Dojo will inform the customer of the outcome and given order status through the Order and Pay customer interface.
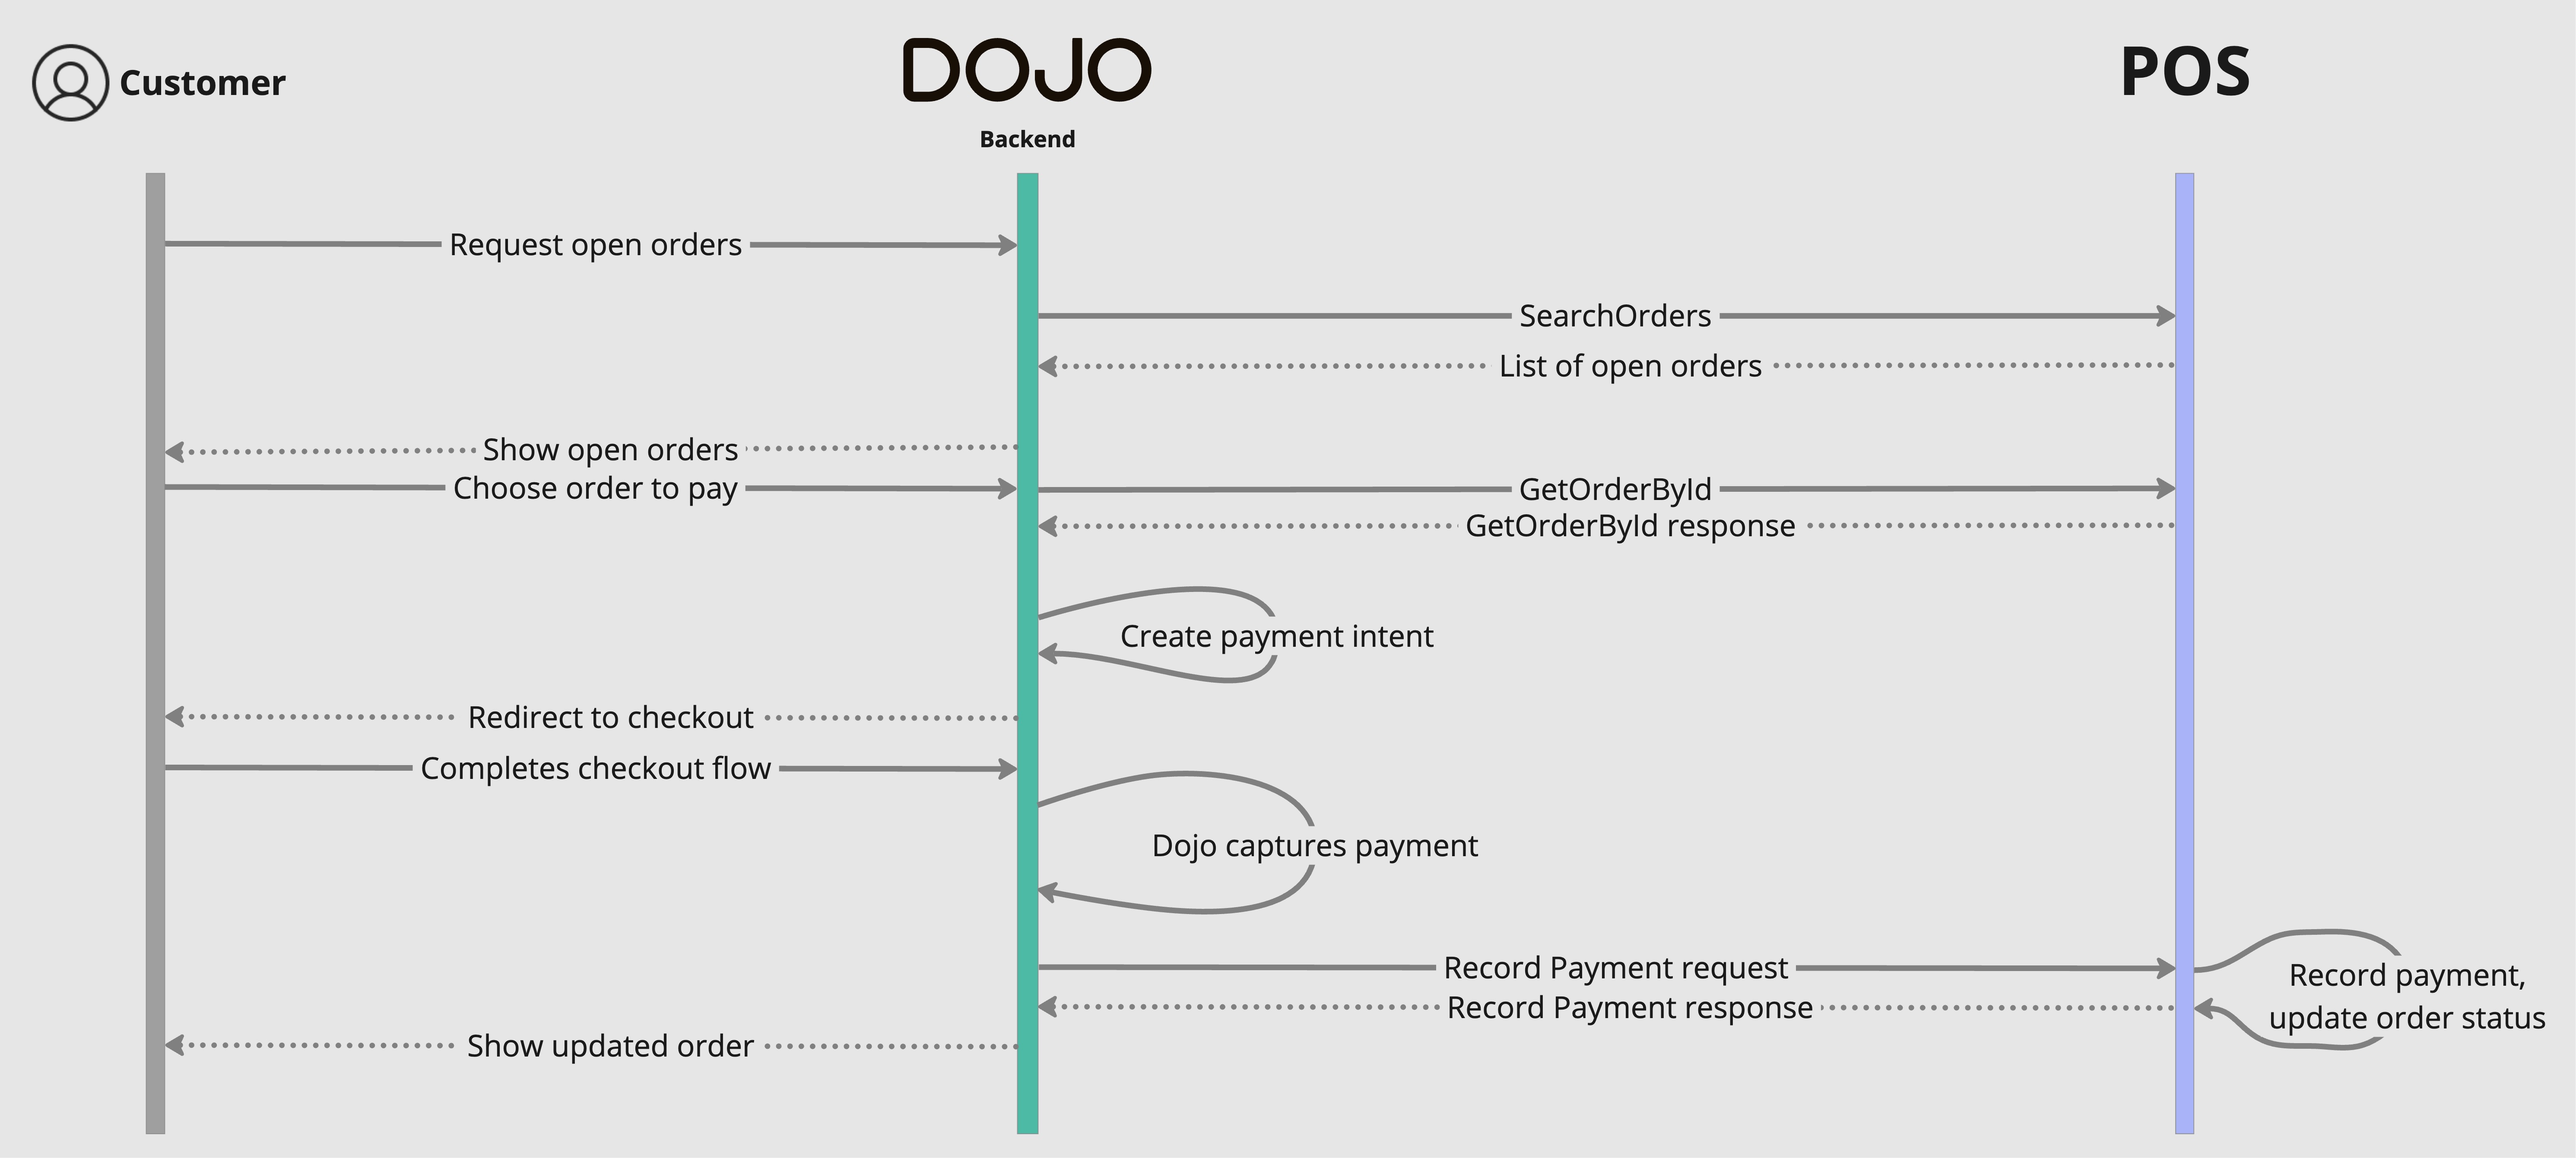
The following diagram demonstrates how the Order and Pay product will interact with Dojo and the POS system to exclusively complete payments:

Step-by-step: Pay-only
Step 1: Customer retrieves orders
Main page: Orders
The first stage of the pay-only flow is triggered when a customer attempts to retrieve open orders using the Order and Pay interface. Dojo will request these from the POS using the SearchOrders capability, refining the request by certain filters such as table ID. Once Dojo has received the orders requested, these will be displayed to the customer for selection.
Step 2: User selects order, Dojo requests order details
Main page: Orders
The user will then select the relevant order from their table's order list: this will trigger a call from Dojo to retrieve the details of that specific order from the POS before attempting to record the payment, ensuring that the amount and other details are up to date.
Step 3: Dojo creates a Payment Intent and authorises the payment
POST REST /v1/orders/{orderId}/record-payment
Main page: RecordOrderPayment
Once the correct order has been selected by the customer, Dojo will create a Payment Intent and initiate the checkout flow for the customer to capture payment.
Dojo will now capture the pre-authorised payment. Once captured, Dojo will use a RecordOrderPayment request containing the relevant orderId to inform the POS that the payment is captured. A paymentIntentId will be included in this request which should be recorded and can be used for retrieving payment details such as receipt data upon payment completion.
The POS should respond to this request with a 200 response to indicate that the payment has been acknowledged and recorded. The POS should also respond with the current order "status" to show any changes that may have occurred to this attribute.
If the payment cannot be recorded, such as in the event of a mismatching value being submitted in the RecordOrderPayment request, the POS should reject the request with a 409 error and the relevant errorType, for example: "Conflict". This will trigger a payment reversal on the customer app and prompt the user to reattempt the payment.
Note: The POS may receive multiple RecordOrderPayment requests from different iniating customers, such as in the instance of a table of guests paying for their own individual items, and therefore should be prepared to see multiple requests.
Step 4: Dojo displays updated order status to customer
After receiving a successful response from the POS to the RecordOrderPayment request, Dojo will inform the customer of the outcome and given order status through the Order and Pay customer interface.