Step-by-step guide
Learn how to integrate Save Card functionality using Dojo's hosted checkout page for later use.
Follow the step-by-step guide to integrate save card functionality to your checkout page.
- Dojo understands that each checkout page is built differently. The steps listed serve as a good reference to build this feature into your checkout page.
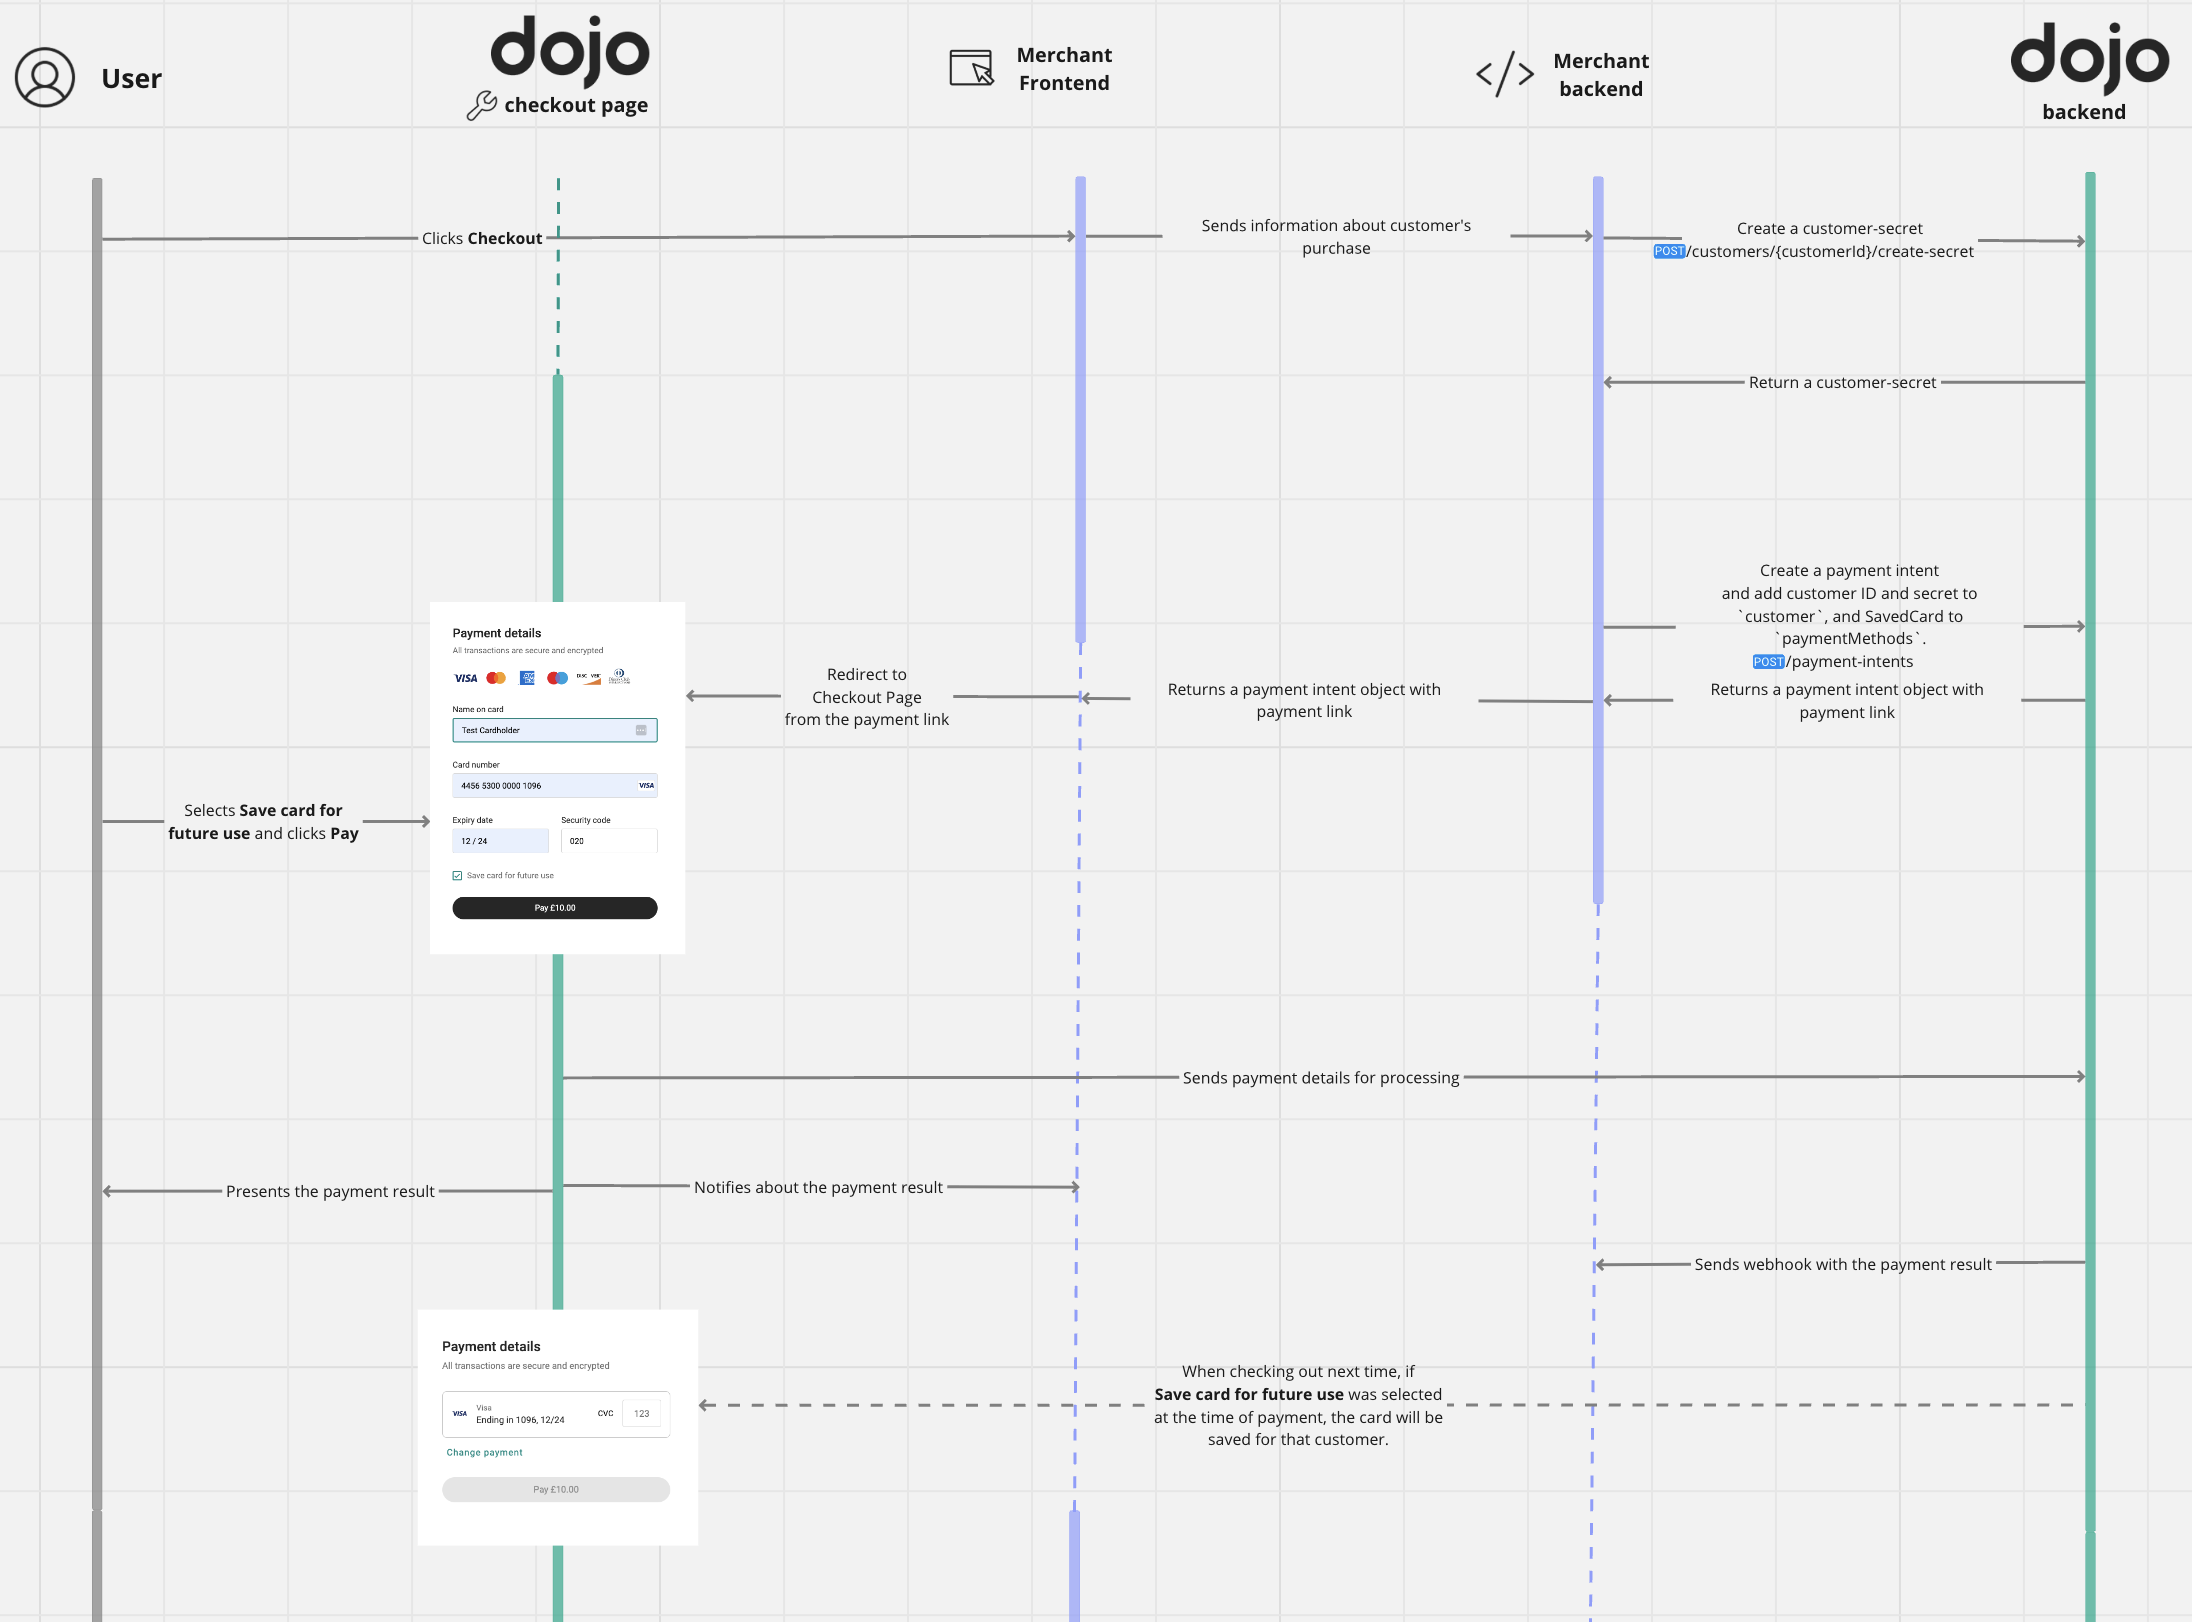
Flow diagram: Save Card Web Flow
sequenceDiagram
    actor U as User
    participant CP as dojo checkout page
    participant MF as Merchant Frontend
    participant MB as Merchant backend
    participant DB as dojo backend

    U->>MF: Clicks Checkout
    MF->>MB: Sends information about customer's purchase
    MB->>DB: POST /customers/{customerId}/create-secret
    DB-->>MB: Return a customer-secret
    Note right of MB: Create a payment intent and add customer ID<br/>and secret to `customer`, and SavedCard<br/>to `paymentMethods`.
    MB->>DB: POST /payment-intents
    DB-->>MB: Returns a payment intent object with payment link
    MB-->>MF: Returns a payment intent object with payment link
    MF->>CP: Redirect to Checkout Page from the payment link
    U->>CP: Selects Save card for future use and clicks Pay
    CP->>DB: Sends payment details for processing
    DB->>MB: Sends webhook with the payment result
    DB-->>CP: Notifies about the payment result
    CP-->>U: Presents the payment result
    CP-->>MF: Notifies about the payment result

    Note over MF,DB: When checking out next time, if Save card for future use was selected at the time of payment, the card will be saved for that customer.
Step 1: Create a new customer or retrieve an existing customer
- If you don't have a Dojo user linked to your backend user, create a new one using POST/customers.
- If you already have a
customerId, retrieve it.
- Don't create a new customer for each transaction. This prevents customers from accessing their saved cards.
Step 2: Create a customer secret key
To set up saved cards or retrieve information about saved cards for a specific customer, you must create and pass a customer secret using POST /customers/{customerId}/create-secret.
- You must always create a customer
secretat your backend and then pass it to your checkout page. - Never store sensitive data such as API Keys inside your checkout page.
- Customer
secretis short-lived, hence Dojo recommends creating a new one each time your app might need to access stored payment methods.
The following code samples demonstrate how to create a customer secret.
- cURL
- PowerShell
- Python
- C#
- PHP
# The sandbox API key passed in 'authorization' is public.
# Don't submit any personally identifiable information in any requests made with this key.
# Sign in to developer.dojo.tech to create your own private sandbox key and use that instead
# for secure testing.

curl -v --request POST \
  --url https://api.dojo.tech/customers/cust_sandbox_6g-HvPv6VkG_Q_PXCpJqmw/create-secret \
  --header 'Content-Type: application/json' \
  --header 'Authorization: Basic sk_sandbox_c8oLGaI__msxsXbpBDpdtwJEz_eIhfQoKHmedqgZPCdBx59zpKZLSk8OPLT0cZolbeuYJSBvzDVVsYvtpo5RkQ' \
  --header 'Version: 2024-02-05'
# This is a public sandbox API key.
# Don’t submit any personally identifiable information in any requests made with this key.
# Sign in to developer.dojo.tech to create your own private sandbox key and use that instead
# for secure testing.

$publicSandboxKey = "sk_sandbox_c8oLGaI__msxsXbpBDpdtwJEz_eIhfQoKHmedqgZPCdBx59zpKZLSk8OPLT0cZolbeuYJSBvzDVVsYvtpo5RkQ"

Invoke-WebRequest `
    -Uri 'https://api.dojo.tech/customers/cust_sandbox_6g-HvPv6VkG_Q_PXCpJqmw/create-secret' `
    -Method POST `
    -Headers @{
        "Version" = "2024-02-05"
        "Authorization" = "Basic $publicSandboxKey"
    } `
    -ContentType 'application/json'
# The sandbox API key passed in 'authorization' is public.
# Don't submit any personally identifiable information in any requests made with this key.
# Sign in to developer.dojo.tech to create your own private sandbox key and use that instead
# for secure testing.

import http.client
import json

conn = http.client.HTTPSConnection("api.dojo.tech")
payload = ''
headers = {
  'Version': '2024-02-05',
  'Content-Type': 'application/json',
  'Authorization': 'Basic sk_sandbox_c8oLGaI__msxsXbpBDpdtwJEz_eIhfQoKHmedqgZPCdBx59zpKZLSk8OPLT0cZolbeuYJSBvzDVVsYvtpo5RkQ'
}
conn.request("POST", "/customers/cust_sandbox_6g-HvPv6VkG_Q_PXCpJqmw/create-secret", payload, headers) #"/customers/{customer-secret id you created}/create-secret
res = conn.getresponse()
data = res.read()
print(data.decode("utf-8"))
conn.close()
// The sandbox API key passed in 'ApiKeyClientAuthorization' is public.
// Don't submit any personally identifiable information in any requests made with this key.
// Sign in to developer.dojo.tech to create your own private sandbox key and use that instead
// for secure testing.

using Dojo.Net;
using System.Text.Json;

var customersClient = new CustomersClient(new HttpClient(), new ApiKeyClientAuthorization("sk_sandbox_c8oLGaI__msxsXbpBDpdtwJEz_eIhfQoKHmedqgZPCdBx59zpKZLSk8OPLT0cZolbeuYJSBvzDVVsYvtpo5RkQ"));
var result = await customersClient.CreateCustomerSecretAsync("<CUSTOMER_ID>");
<?php
// The sandbox API key used in this example is public.
// Don't submit any personally identifiable information in any requests made with this key.
// Sign in to developer.dojo.tech to create your own private sandbox key and use that instead
// for secure testing.

namespace Test;
require_once "vendor/autoload.php";

use Dojo_PHP\ApiFactory;

$apiKey = "sk_sandbox_c8oLGaI__msxsXbpBDpdtwJEz_eIhfQoKHmedqgZPCdBx59zpKZLSk8OPLT0cZolbeuYJSBvzDVVsYvtpo5RkQ";

$apiCustomers = ApiFactory::createCustomersApi($apiKey);
$secret = $apiCustomers->customersCreateCustomerSecret("cust_sandbox_6g-HvPv6VkG_Q_PXCpJqmw", \Dojo_PHP\API_VERSION);
Step 3: Create a payment intent linked to the customerId
For every payment intent you create, you must pass the customer's id, secret to the payment intent request body and enable SavedCard parameter inside paymentMethods. The customer secret key is a confidential identifier linked to individual customers.
"paymentMethods": ["SavedCard", "Card"],
  "customer": {
    "id": "cust_sandbox_vjUhNwRjBE2xSeLVS_DFyQ",
    "secret": "cs_sandbox_<your_customer_secret_key>"
  }
Step 4: Initiate payment flow in the checkout page
Display the payment link to the customer to start the checkout process. The payment link can be obtained from the response body. An example of the reponse body with payment link displayed and savedCard enabled would look like:
{
    "id": "pi_sandbox_gii78EXbJEyeVnuBglFgQA",
    "captureMode": "Auto",
    "cardHolderNotPresent": false,
    "clientSessionSecretExpirationDate": "0001-01-01T00:00:00Z",
    "status": "Created",
    "paymentMethods": [
        "SavedCard",
        "Card"
    ],
    "amount": {
        "value": 1000,
        "currencyCode": "GBP"
    },
    "totalAmount": {
        "value": 1000,
        "currencyCode": "GBP"
    },
    "refundedAmount": 0,
    "customer": {
        "id": "cust_sandbox_vjUhNwRjBE2xSeLVS_DFyQ"
    },
    "createdAt": "2024-04-02T14:21:35.402137Z",
    "updatedAt": "2024-04-02T14:21:35.402137Z",
    "reference": "Order 234",
    "description": "Demo payment intent",
    "itemLines": [],
    "taxLines": [],
    "merchantConfig": {
        "supportedPaymentMethods": {
            "cardSchemes": [
                "VISA",
                "MASTERCARD",
                "MAESTRO",
                "DISCOVER",
                "DCI"
            ],
            "wallets": [
                "APPLE_PAY",
                "GOOGLE_PAY"
            ]
        }
    },
    "config": {
        "branding": {},
        "tradingName": "Cam Test Ltd"
    },
    "paymentSource": "api",
    "expireAt": "2024-05-02T14:21:35.402204Z",
    "metadata": {
        "location-id": "rpl_bOppxLvOEsS"
    },
    "paymentEvents": [],
    "paymentLink": "https://pay.dojo.tech:443/checkout/pi_sandbox_gii78EXbJEyeVnuBglFgQA?cid=cust_sandbox_vjUhNwRjBE2xSeLVS_DFyQ&csc=cs_sandbox_xrLk_6EwFBiRXRDkDYu6-bxy1XwXxoF1YiNvyCY4er5DfxE_SsF8SlPqY6FNnPcxd91Y9d19U4-Brye4XGoXJZBTOijo6BUo-DS2qL6KjTHmZlJC--jkiaUlu3v6XA7tPrJnfSz6ary2xjculxEia5bdIBkfh-Bo8sj2GoKF0v8&cpm=pm_RDg255vaRu6RRHluXQLG1A",
    "terminalSessionHistory": []
}
Step 5: Receive payment status
Once payment is completed, you get a notification with a numerical code representing the result. Check out the status codes reference for more information about what each code means. Additionally, your backend will receive a notification via Webhook.
Setting a preferred payment card
You can enable customers having multiple saved cards to set a preferred payment card. This allows for seamless checkout experiences, as their preferred card will be automatically selected for future transactions. To set a preferred card, do the following:
Dojo assumes you have already set up your client side to allow customers to select their preferred card. The API allows you to specify a preferred method ID, which preselects the card during checkout.
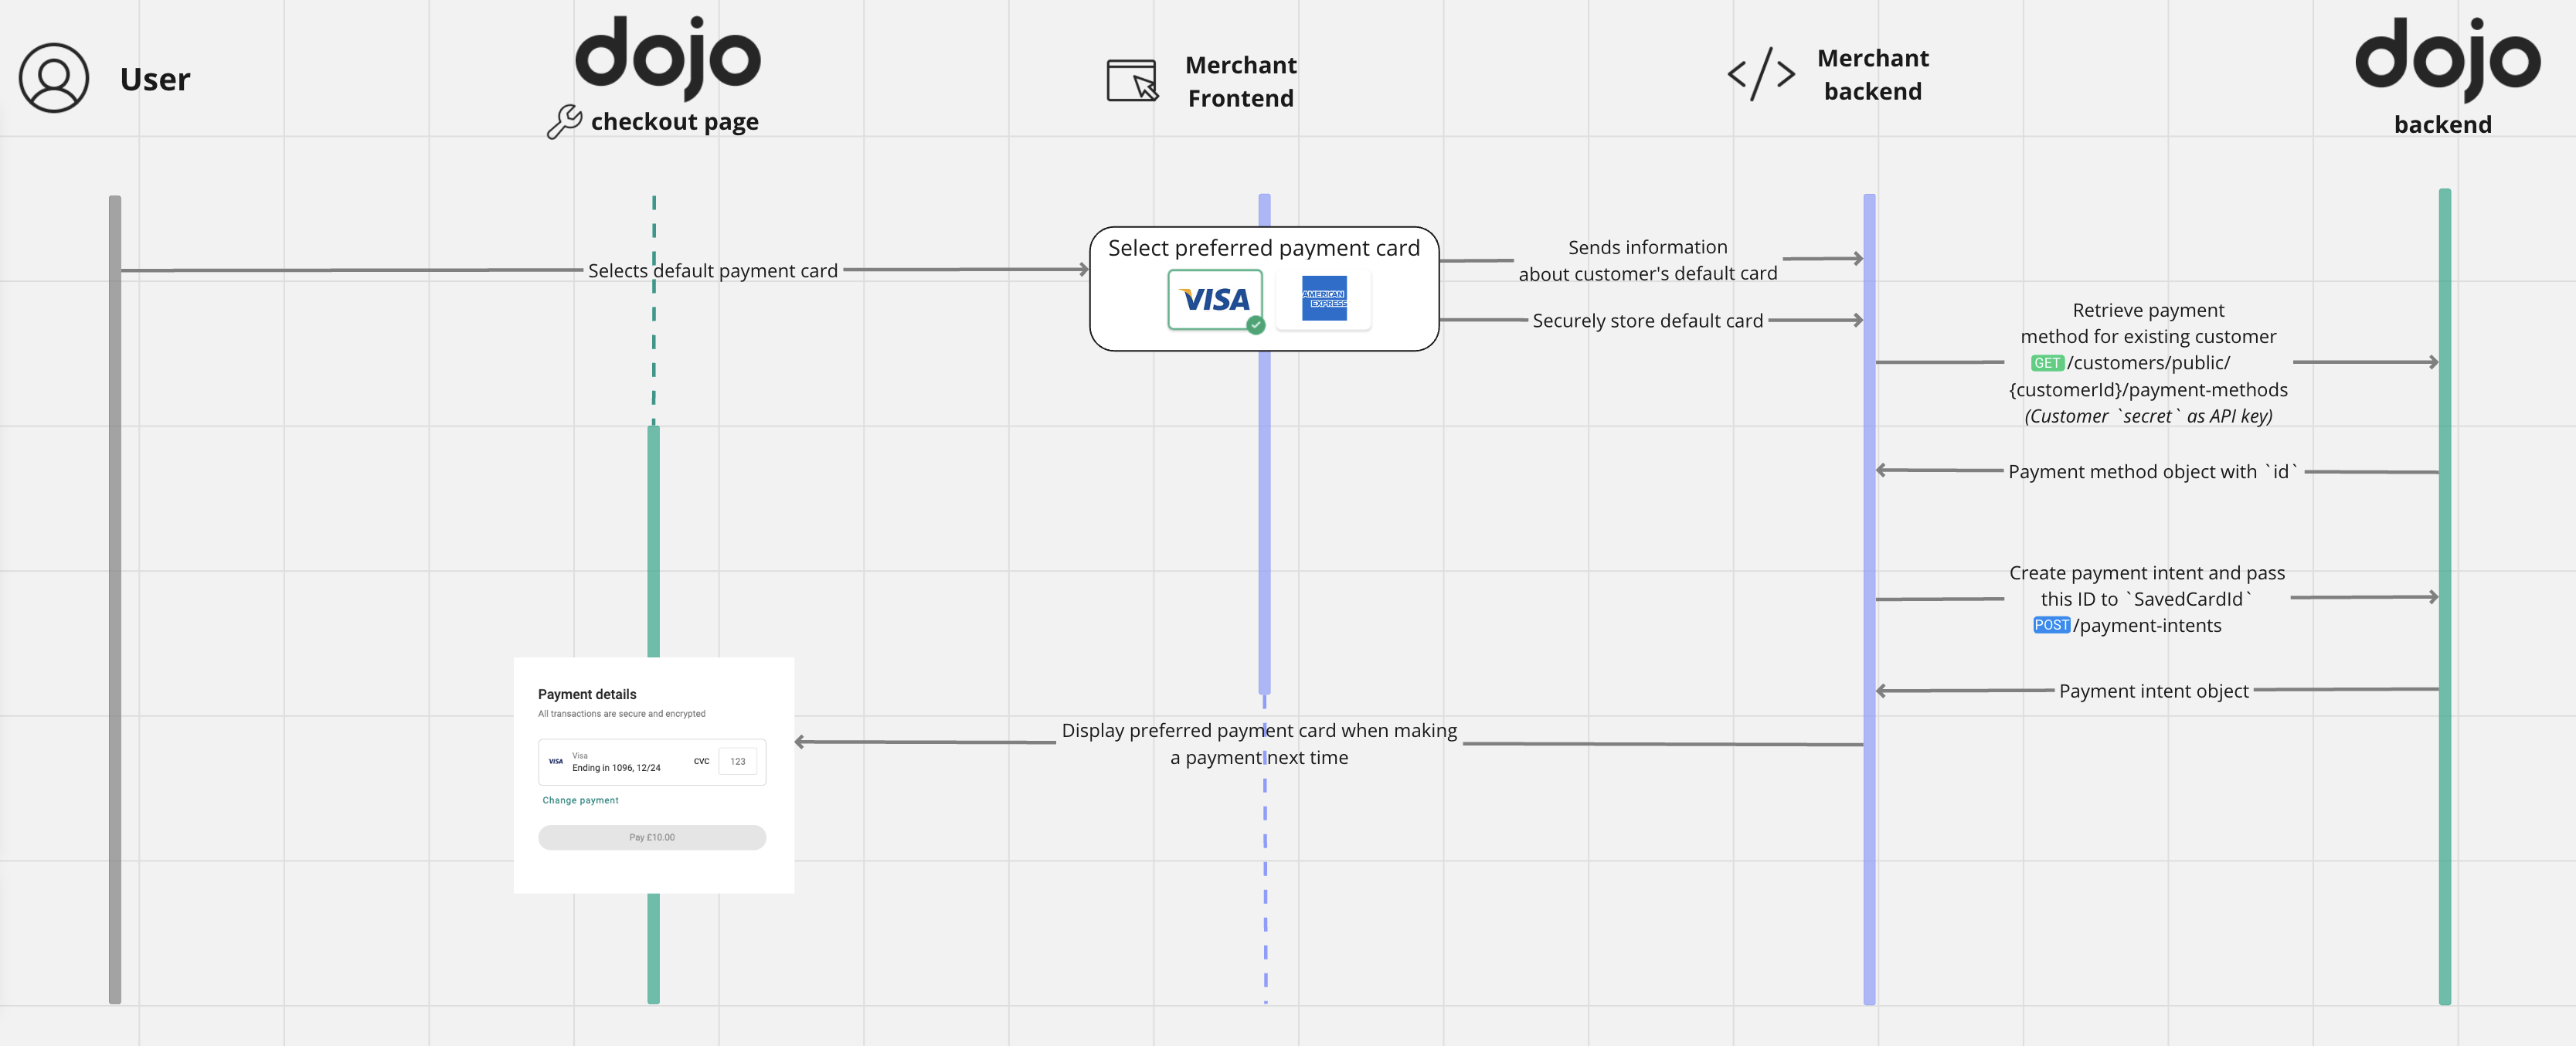
-
Before creating a payment intent, retrieve the payment method for an existing customer using the GET/customers/public/{customerId}/payment-methods endpoint. Set the following parameters to get started:
- API key: To authenticate the payment, add your customer
secretas the API key. For example:cs_sandbox_<your_customer_secret_key>. customerId: To authenticate a payment against a particular customer, add the customer ID you created in step 1.
This returns an
idfor the saved method. A sample response looks like the following:{
"customerId": "cust_sandbox_vjUhNwRjBE2xSeLVS_DFyQ",
"merchantId": "771402011592305",
"savedPaymentMethods": [
{
"id": "pm_RDg255vaRu6RRHluXQLG1A",
"cardDetails": {
"pan": "44565300****1096",
"expiryDate": "2024-12-31",
"scheme": "VISA"
}
},
{
"id": "pm_Lpgcm_7XSb2ydNFkgZ9Czg",
"cardDetails": {
"pan": "52000000****1005",
"expiryDate": "2024-12-31",
"scheme": "MASTERCARD"
}
}
],
"supportedPaymentMethods": {
"cardSchemes": [
"VISA",
"MASTERCARD",
"MAESTRO",
"AMEX"
]
}
} - API key: To authenticate the payment, add your customer
-
Pass this ID as
SavedCardIdto your client side when creating a payment intent undercustomerusing POST/payment-intents.{
"paymentMethods": ["SavedCard", "Card"],
"customer": {
"id": "cust_sandbox_vjUhNwRjBE2xSeLVS_DFyQ",
"secret": "cs_sandbox_xrLk_6EwFBiRXRDkDYu6-bxy1XwXxoF1YiNvyCY4er5DfxE_SsF8SlPqY6FNnPcxd91Y9d19U4-Brye4XGoXJZBTOijo6BUo-DS2qL6KjTHmZlJC--jkiaUlu3v6XA7tPrJnfSz6ary2xjculxEia5bdIBkfh-Bo8sj2GoKF0v8",
"SavedCardId": "pm_RDg255vaRu6RRHluXQLG1A"
}
}The
SavedCardId: pm_RDg255vaRu6RRHluXQLG1Ais the payment card that was set by your customer as the preferred card for future transactions. It will be automatically pre-selected for all future payments unless you add another saved card ID from the list of GET /customers/public/{customerId}/payment-methods. At your client side, this ID should be valid until the customer decides to remove it or chooses another card as their preferred option.