Step-by-step guide
Learn how to implement our Checkout Page to accept payments.
A checkout page integration contains the following:
-
Server-side: one API request to create a payment intent.
-
Client-side: a redirect to the Checkout Page.
-
WebHooks: a server-side endpoint to receive information about the payment.
The payment flow is:
-
The customer visits the merchant's site and clicks the Checkout button.
-
The merchant client-side sends the customer's purchases information to the merchant server-side, and the merchant server-side sends this information to the Dojo server and creates a payment intent.
-
The merchant client-side redirects the customer to the Prebuilt Checkout Page, which is hosted by Dojo.
-
The Prebuilt Checkout Page collects the customer's payment details, sends them to the Dojo servers, and redirects the customer to the results page.
-
The merchant server receives a WebHook notification when the payment is completed.
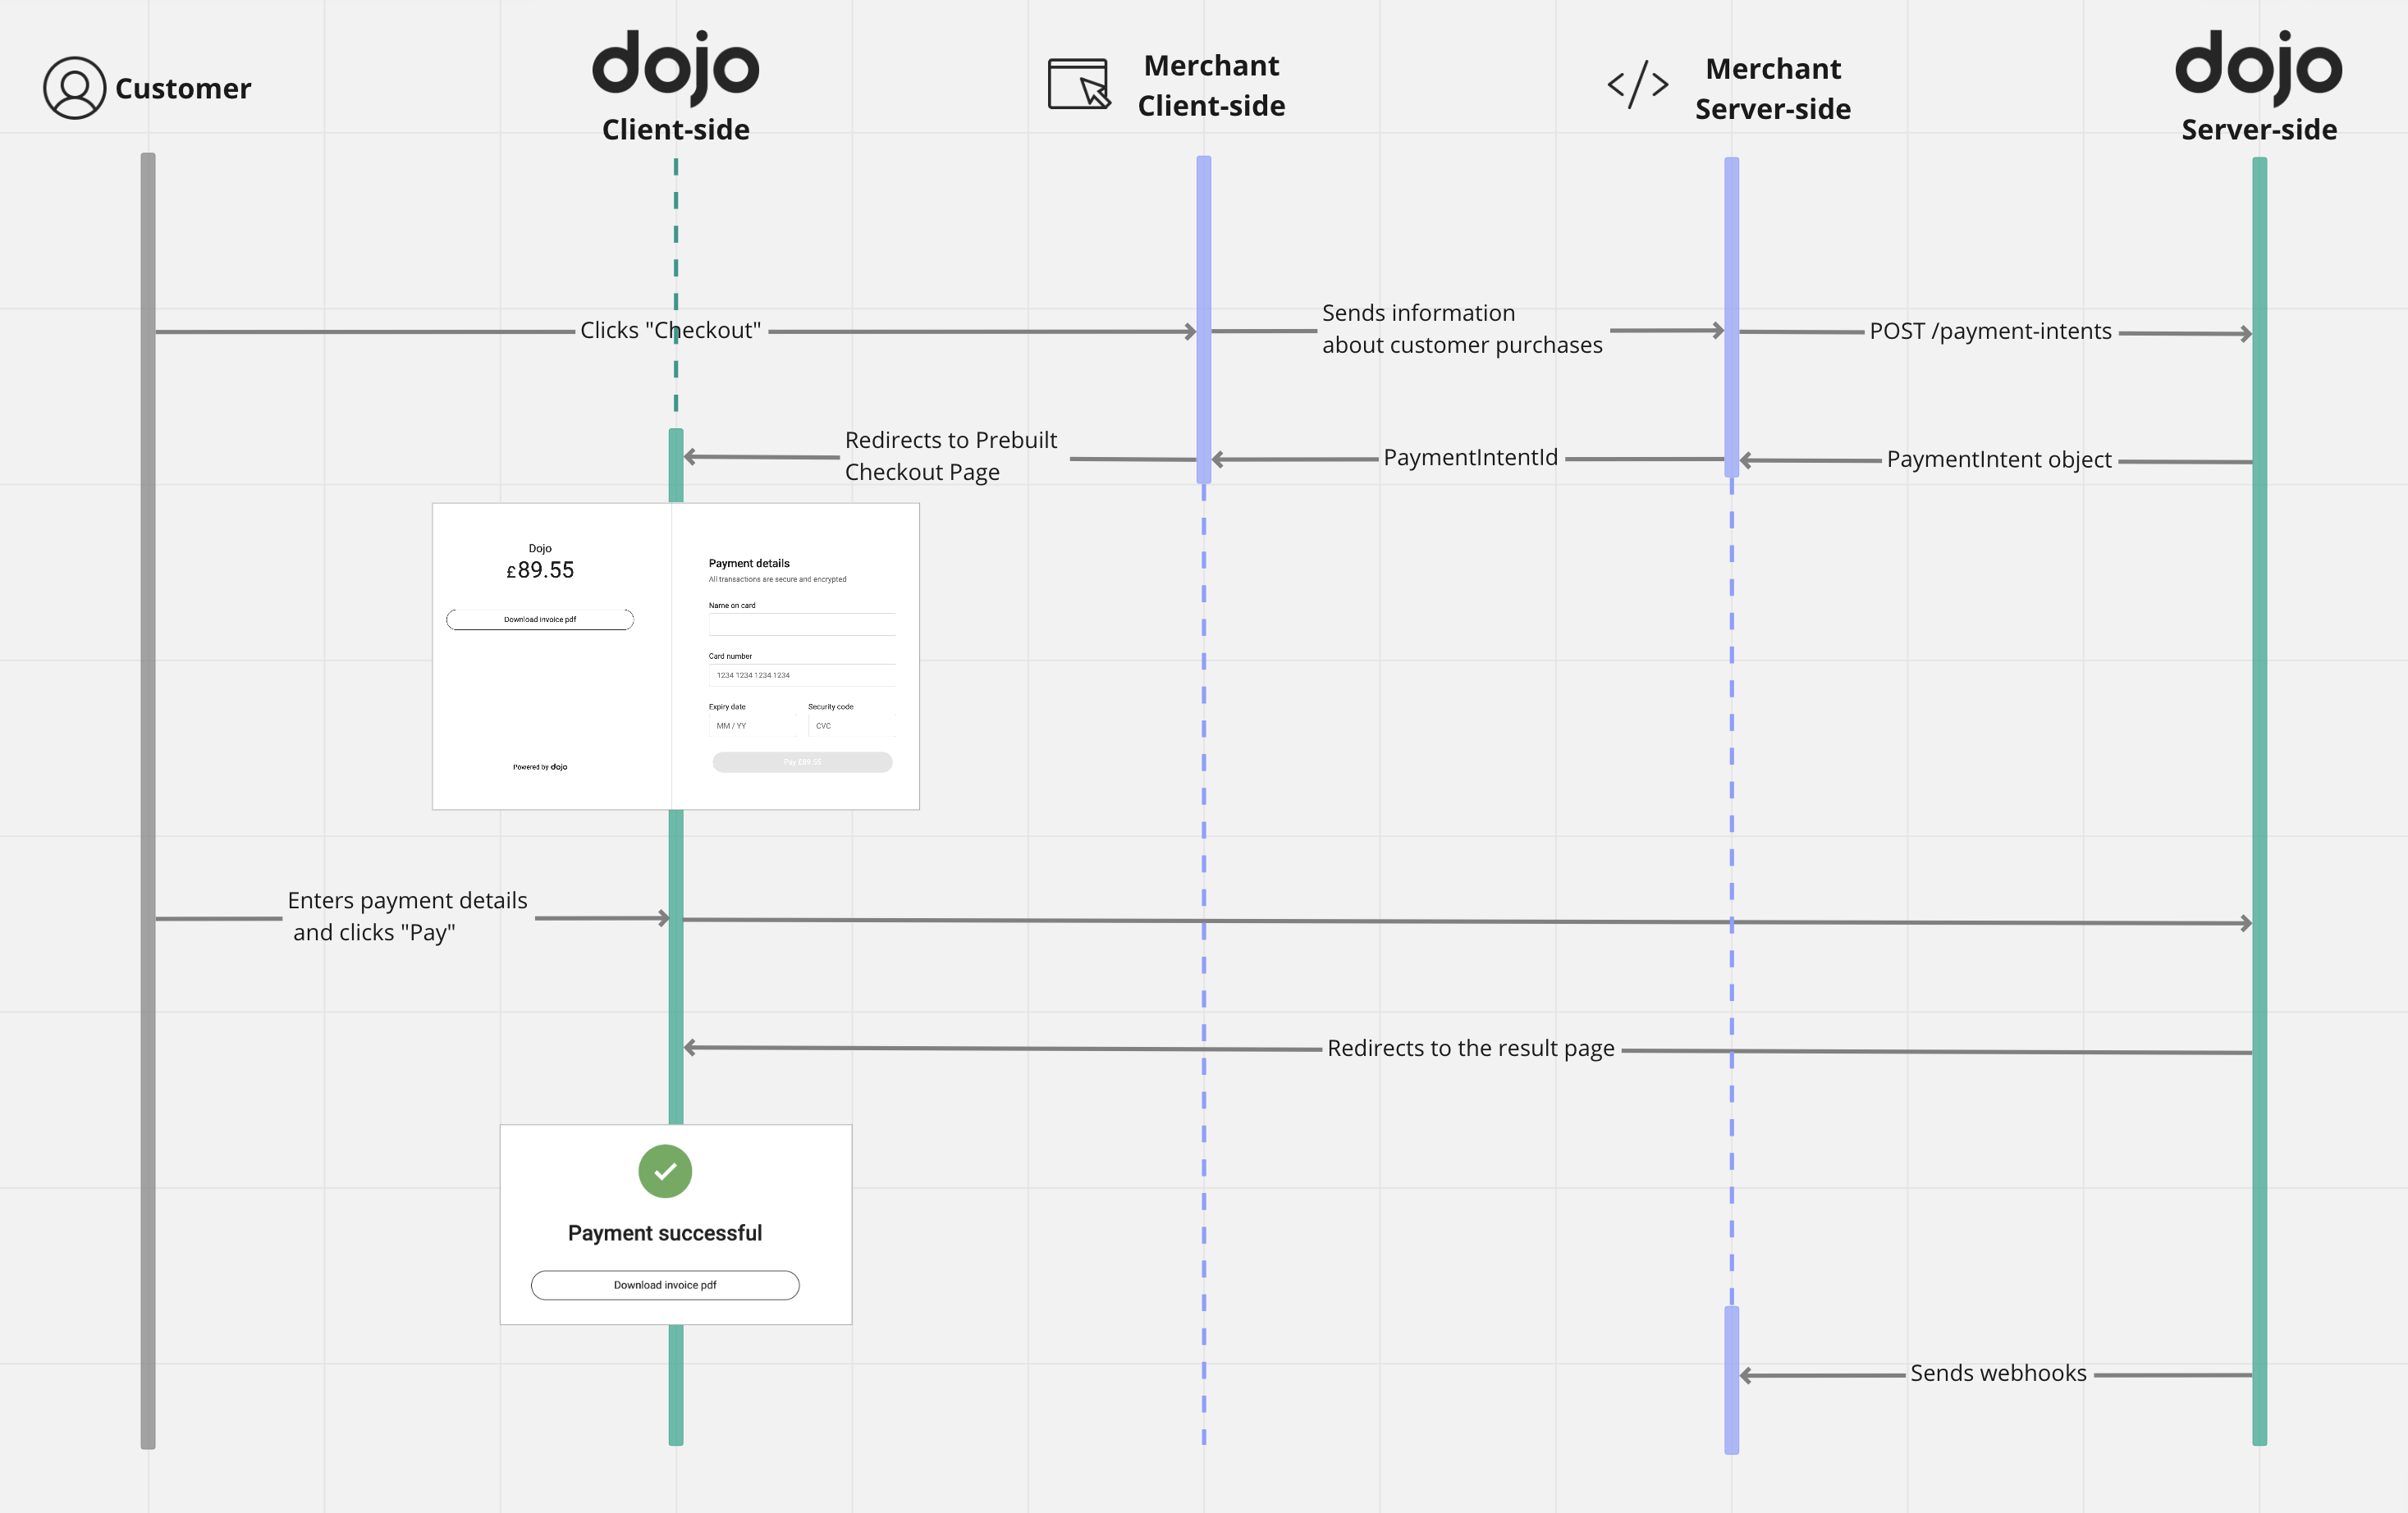
Flow diagram: Flow Checkout Page
sequenceDiagram
    actor C as Customer
    participant DC as dojo Client-side
    participant MC as Merchant Client-side
    participant MS as Merchant Server-side
    participant DS as dojo Server-side

    C->>MC: Clicks "Checkout"
    MC->>MS: Sends information about customer purchases
    MS->>DS: POST /payment-intents
    DS-->>MS: PaymentIntent object
    MS-->>MC: PaymentIntentId
    MC->>DC: Redirects to Prebuilt Checkout Page
    C->>DC: Enters payment details and clicks "Pay"
    DS-->>DC: Redirects to the result page
    DS->>MS: Sends webhooks
LLM walkthrough: complete Checkout Page happy path
Use this template when your server creates the payment intent and the browser only needs to redirect the customer to Dojo Checkout.
All Dojo REST calls in this walkthrough use:
Authorization: Basic <api_key>(literalBasicprefix; do not base64-encodeapi_key:)version: 2026-02-27Content-Type: application/json
1. Create the payment intent with a redirect URL
POST /payment-intents
Request body
{
  "amount": {
    "value": 1000,
    "currencyCode": "GBP"
  },
  "reference": "Order-0001",
  "description": "Hosted checkout payment for basket 245",
  "config": {
    "redirectUrl": "https://merchant.example/checkout/success"
  }
}
Response body
{
  "id": "pi_sandbox_G_FeegU8WESxtY_Nct8jqw",
  "captureMode": "Auto",
  "status": "Created",
  "paymentMethods": [
    "Card"
  ],
  "amount": {
    "value": 1000,
    "currencyCode": "GBP"
  },
  "totalAmount": {
    "value": 1000,
    "currencyCode": "GBP"
  },
  "refundedAmount": 0,
  "createdAt": "2024-04-07T23:25:44.802258Z",
  "updatedAt": "2024-04-07T23:25:44.802258Z",
  "reference": "Order-0001",
  "description": "Hosted checkout payment for basket 245",
  "paymentLink": "https://pay.dojo.tech/checkout/pi_sandbox_G_FeegU8WESxtY_Nct8jqw",
  "paymentEvents": [],
  "terminalSessionHistory": []
}
2. Return the checkout URL to the browser and redirect the customer
Your own backend can return the payment link it received from Dojo:
{
  "paymentIntentId": "pi_sandbox_G_FeegU8WESxtY_Nct8jqw",
  "paymentLink": "https://pay.dojo.tech/checkout/pi_sandbox_G_FeegU8WESxtY_Nct8jqw"
}
Then redirect the browser to paymentLink:
window.location.replace("https://pay.dojo.tech/checkout/pi_sandbox_G_FeegU8WESxtY_Nct8jqw");
3. Handle the success page by fetching the latest payment status
When the browser lands on your redirectUrl, load the paymentIntentId you stored for the checkout session and call Dojo from your backend to render the latest status on the page.
GET /payment-intents/pi_sandbox_G_FeegU8WESxtY_Nct8jqw
Response body
{
  "id": "pi_sandbox_G_FeegU8WESxtY_Nct8jqw",
  "captureMode": "Auto",
  "status": "Captured",
  "paymentMethods": [
    "Card"
  ],
  "amount": {
    "value": 1000,
    "currencyCode": "GBP"
  },
  "totalAmount": {
    "value": 1000,
    "currencyCode": "GBP"
  },
  "refundedAmount": 0,
  "reference": "Order-0001",
  "description": "Hosted checkout payment for basket 245",
  "paymentDetails": {
    "transactionId": "19e4535e-ef6e-48e2-90be-d2b313c1cefd",
    "transactionDateTime": "2024-07-25T08:49:20.973410318Z",
    "message": "DEPOSITED",
    "authCode": "123456",
    "card": {
      "cardNumber": "44565300****1096",
      "cardName": "test",
      "expiryDate": "2024-12-31",
      "cardType": "VISA",
      "entryMode": "Contactless",
      "verificationMethod": "Pin"
    }
  },
  "paymentEvents": [
    {
      "transactionId": "19e4535e-ef6e-48e2-90be-d2b313c1cefd",
      "transactionDateTime": "2024-07-25T08:49:20.973410318Z",
      "eventType": "Captured",
      "authCode": "123456",
      "cardNumber": "44565300****1096",
      "expiryDate": "2024-12-31",
      "cardType": "VISA",
      "cardholderName": "test",
      "paymentMethodId": ""
    }
  ]
}
Use the success page for customer UX only. Treat the webhook as the final source of truth for order fulfilment.
4. Subscribe to and verify the webhook notification
POST /webhooks
Request body
{
  "events": [
    "payment_intent.status_updated"
  ],
  "url": "https://merchant.example/webhooks/dojo"
}
Response body
{
  "id": "ws_aNkU6yob0vOMxUlghg2oynUw",
  "accountId": "acc_4z3k2xP17e1JQY",
  "events": [
    "payment_intent.created",
    "payment_intent.status_updated"
  ],
  "url": "https://merchant.example/webhooks/dojo",
  "description": "Demo Webhooks",
  "secrets": [
    {
      "id": "sc_qNkU6yob0vOMxUlb2oynUw",
      "value": "U3Vic2NyaXB0aW9uUmVzcG9uc2VFeGFtcGxlIDogSUV4YW1wbGVQcm92aWRlcjxTdWJ",
      "createdAt": "2023-12-13T14:15:01",
      "lastUsedAt": "2023-12-16T13:44:03.3242202Z",
      "isActive": true
    }
  ],
  "createdAt": "2023-03-30T12:21:04.143Z",
  "updatedAt": "2023-03-30T12:21:04.143Z"
}
Incoming webhook payload
{
  "id": "evt_hnnHxIKR_Uy6bhZCusCltw",
  "event": "payment_intent.status_updated",
  "accountId": "acc_test",
  "createdAt": "2024-07-25T08:49:24.761Z",
  "data": {
    "paymentIntentId": "pi_sandbox_G_FeegU8WESxtY_Nct8jqw",
    "paymentStatus": "Captured",
    "captureMode": "Auto"
  }
}
How to process a payment
Step-by-step guide:
Before you start
Before you begin to integrate, make sure you have followed the Getting started guide and got your API keys.
For the test environment, use your secret key with the prefix sk_sandbox_.
Step 1. Create a payment intent
To create a payment intent, the following parameters are required:
-
amount: This includes the currency and value, in minor units, for example, "1000" for 10.00 GBP. -
reference: Your unique reference for the payment intent.
Here's an example of how to create a payment intent for 10 GBP on your server-side:
- Python
- C#
@app.route('/checkout', methods=['GET', 'POST'])
def hello():
    # POST request
    if request.method == 'POST':
        print(request.get_json())  # parse as JSON

        conn = http.client.HTTPSConnection("api.dojo.tech")

        # call post payment-intent
        payload = json.dumps({
          "amount": {
            "value": 1000,
            "currencyCode": "GBP"
          },
          "reference": "Order 245"
          })
        headers = {
            'Content-Type': "application/json",
            'Version': "2024-02-05",
            'Authorization': "Basic sk_sandbox_c8oLGaI__msxsXbpBDpdtwJEz_eIhfQoKHmedqgZPCdBx59zpKZLSk8OPLT0cZolbeuYJSBvzDVVsYvtpo5RkQ" # <-- Change to your secret key
            }
        conn.request("POST", "/payment-intents/", payload, headers)

        # handling the response from POST
        res = conn.getresponse()
        data = res.read()
        resp_data = {}
        resp_data['id'] = json.loads(data)["id"]
        json_data = json.dumps(resp_data)
        resp = app.response_class(
          response=json_data,
          mimetype='application/json'
          )
        return resp
using Dojo.Net;

var paymentIntentsClient = new PaymentIntentsClient(new HttpClient(), new ApiKeyClientAuthorization("sk_sandbox_c8oLGaI__msxsXbpBDpdtwJEz_eIhfQoKHmedqgZPCdBx59zpKZLSk8OPLT0cZolbeuYJSBvzDVVsYvtpo5RkQ"));
var result = await paymentIntentsClient.CreatePaymentIntentAsync(new CreatePaymentIntentRequest
{
    Amount = new()
    {
        Value = 1000,
        CurrencyCode = "GBP"
    },
    Reference = "Order 245"
});
See the API reference for a complete list of parameters that can be used for payment intent creation.
Step 2. Redirect your customer to Dojo Checkout Page
After receiving the request, Dojo creates a payment intent and returns its unique ID:
{
    "id": "pi_CggWPWfehUWgVNnDdsdLMQ",
    ...
}
Return this ID to the client-side and use it to create a link in the following format:
https://pay.dojo.tech/checkout/{{id}}
Redirect your customer to the link on your client-side:
        .then(response => response.json())
        .then(function (data) {
          var redirectLink = "https://pay.dojo.tech/checkout/" + data.id
          window.location.replace(redirectLink)
        });
After your customer fills payment information on the checkout page, Dojo processes the payment and redirects the customer to the success page.
Step 3. Handle post-payment events
Use webhooks to receive information about the payment. We send a payment_intent.status_updated event when the payment is completed (captured, refunded, released, reversed, canceled).
Here's an example of how to subscribe to the payment_intent.status_updated event:
- cURL
- PowerShell
- Python
- C#
- PHP
# The sandbox API key passed in 'authorization' is public.
# Don't submit any personally identifiable information in any requests made with this key.
# Sign in to developer.dojo.tech to create your own private sandbox key and use that instead
# for secure testing.

curl -v --request POST \
  --url https://api.dojo.tech/webhooks \
  --header 'Authorization: Basic sk_sandbox_c8oLGaI__msxsXbpBDpdtwJEz_eIhfQoKHmedqgZPCdBx59zpKZLSk8OPLT0cZolbeuYJSBvzDVVsYvtpo5RkQ' \
  --header 'Content-Type: application/json' \
  --header 'Version: 2024-02-05' \
  --data '{
    "events": ["payment_intent.status_updated"],
    "url": "https://example.com/incoming-events"
  }'
# This is a public sandbox API key.
# Don’t submit any personally identifiable information in any requests made with this key.
# Sign in to developer.dojo.tech to create your own private sandbox key and use that instead
# for secure testing.

$publicSandboxKey = "sk_sandbox_c8oLGaI__msxsXbpBDpdtwJEz_eIhfQoKHmedqgZPCdBx59zpKZLSk8OPLT0cZolbeuYJSBvzDVVsYvtpo5RkQ"

Invoke-WebRequest `
    -Uri 'https://api.dojo.tech/webhooks' `
    -Method POST `
    -Headers @{
        "version" = "2024-02-05"
        "Authorization" = "Basic $publicSandboxKey"
    } `
    -ContentType 'application/json' `
    -Body '{
        "events": [ "payment_intent.status_updated" ],
        "url": "https://example.com/incoming-events"
    }'
# The sandbox API key passed in 'authorization' is public.
# Don't submit any personally identifiable information in any requests made with this key.
# Sign in to developer.dojo.tech to create your own private sandbox key and use that instead
# for secure testing.

import http.client

conn = http.client.HTTPSConnection("api.dojo.tech")

payload = "{\"events\":[\"payment_intent.status_updated\"],\"url\":\"https://example.com/incoming-events\"}"

headers = {
    'Content-Type': "application/json",
    'Version': "2024-02-05",
    'Authorization': "Basic sk_sandbox_c8oLGaI__msxsXbpBDpdtwJEz_eIhfQoKHmedqgZPCdBx59zpKZLSk8OPLT0cZolbeuYJSBvzDVVsYvtpo5RkQ" # <-- Change to your secret key
    }

conn.request("POST", "/webhooks", payload, headers)

res = conn.getresponse()
data = res.read()

print(data.decode("utf-8"))

conn.close()
// The sandbox API key passed in 'ApiKeyClientAuthorization' is public.
// Don’t submit any personally identifiable information in any requests made with this key.
// Sign in to developer.dojo.tech to create your own private sandbox key and use that instead
// for secure testing.

var webhooksClient = new Dojo.Net.WebhooksClient(new HttpClient(), new ApiKeyClientAuthorization("sk_sandbox_c8oLGaI__msxsXbpBDpdtwJEz_eIhfQoKHmedqgZPCdBx59zpKZLSk8OPLT0cZolbeuYJSBvzDVVsYvtpo5RkQ"));

webhooksClient.SubscribeAsync(new SubscriptionRequest()
{
    Events = new List<string>() { "payment_intent.status_updated" },
    Url = new Uri("https://example.com/incoming-events")
});
<?php
// The sandbox API key used in this example is public.
// Don't submit any personally identifiable information in any requests made with this key.
// Sign in to developer.dojo.tech to create your own private sandbox key and use that instead
// for secure testing.

namespace Test;
require_once "vendor/autoload.php";

use Dojo_PHP\ApiFactory;
use Dojo_PHP\Model\SubscriptionRequest;

$apiKey = "sk_sandbox_c8oLGaI__msxsXbpBDpdtwJEz_eIhfQoKHmedqgZPCdBx59zpKZLSk8OPLT0cZolbeuYJSBvzDVVsYvtpo5RkQ";
$api = ApiFactory::createWebhooksApi($apiKey);

$req = new SubscriptionRequest(["url" => "https://example.com/incoming-events", "events" => ["payment_intent.status_updated"]]);

$api->webhooksSubscribe(\Dojo_PHP\API_VERSION, $req);
If you haven't set up webhooks yet, review our webhooks guide.
Step 4. Test and go live
Before going live, test your integration using the test card numbers:
| Card Name | Card number | Expiry Date | CVV | 3D security | Status |
|---|---|---|---|---|---|
Test Cardholder | 5200 0000 0000 1005 | 12/29 | 020 | No | Successful |
Test Cardholder | 5200 0000 0000 1096 | 12/29 | 020 | 2.0 | Successful |
Test Cardholder | 4456 5300 0000 1013 | 12/29 | 341 | No | Decline |
When you are ready to go live, switch your secret key to production one with the prefix sk_prod_.
 Set up notification webhooks Use webhooks to receive updates related to your payments.
 Configure Checkout Page Find out how to add another payment method or shipping address form to the page.
 Check your integration Check off these steps before launching your integration in production.
 Manage payments Learn how to capture or reverse payments, retrieve payment details or change payments amount.