Step-by-step guide
Learn how to create a setup intent and charge the card using the API.
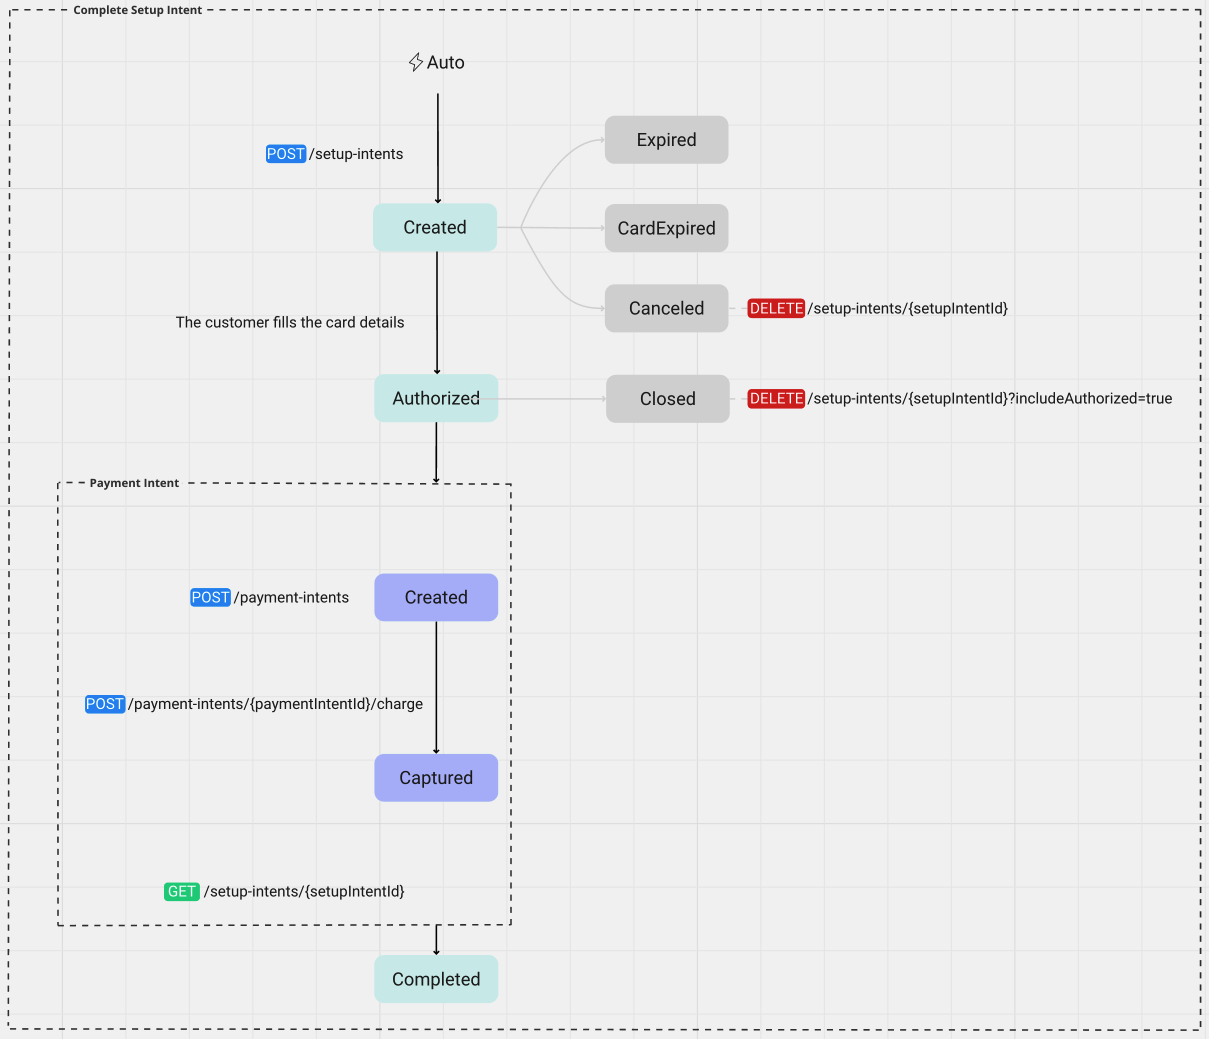
During its lifecycle, the Setup Intent goes through a combination of the following statuses, depending upon your requirements.
| Status | Description |
|---|---|
Created | The setup intent is created. |
Authorized | The customer adds their card details and authorizes the setup intent. |
Expired | The setup intent expired after creation. |
CardExpired | The card entered has passed the expiry date and is no longer usable. |
Canceled | The setup intent in created state is deleted. |
Completed | The setup intent cycle is complete and the merchant has charged the customer's card. |
Closed | The authorized setup intent is also deleted. This is applicable when you set includeAuthorized to true using the DELETE /setup-intents endpoint. |
Flow diagram

Follow the steps below for a complete setup intent flow:
Step 1: Create a setup intent
To create a setup intent, use the following endpoint:
POST /setup-intents
In your request body, include the following:
reference: A reference number to track.intendedAmount: The amount you intend to collect from a customer in the future after a payment method is attached.merchantInitiatedTransactionType: The transaction type you intend to set up.terms: The agreed terms between you and your customer.
- When configuring the
intendedAmount, a customer will not be charged right away. The charge may vary depending upon the terms agreed between a customer and a merchant. - By default, you can create a setup intent with
captureMode: Autoonly.
Request example
The following code sample demonstrates creating a setup intent of 10.00 GBP.
- cURL
- PowerShell
- Python
- C#
loading...
loading...
loading...
loading...
Once you've created a setup intent, the status is updated to ⦿ created.
Step 2. Redirect your customer to Dojo's Checkout page
After receiving the request, Dojo creates a setup intent and returns its unique ID in the following format:
{
    "id": "si_sandbox_Oh69aQaQMUuNIPJcPrcRwQ",
    ...
}
-
Return this ID to the client-side and use it to create a link in the following format:
https://pay.dojo.tech/checkout/{{id}} -
Redirect your customer to the link on your client-side:
online-checkout-client.htmlloading...
After your customer fills in their payment information on the Checkout page, Dojo server-side saves the card details and redirects the customer to the success page.
Once your customer authorizes their card in the setup intent, the status is updated to ⦿ authorized.
Step 3: Create a payment intent and charge the card
After a setup intent has been created and authorized, you can use the setupIntentId to create a payment intent and charge the card. When you are ready to charge the card, create a payment intent and then use the payment intent charge endpoint.
- You can charge the full amount only.
- For the payment intent you create, you can charge a card only once.
Charge a card using the Dojo API
To complete the process of charging a card, ensure you do the following:
-
Create a payment intent and pass the
setupIntentIdto the request.POST /payment-intents
{ ...
   "setupIntentId": "si_sandbox_<secret-key>",
}
Request example
The following code sample demonstrates creating a payment intent of 10.00 GBP using the setup intent ID created in step 1:
- cURL
- PowerShell
- Python
- C#
setup-intent/curl/create-payment-intent.shloading...setup-intent/powershell/create-payment-intent.ps1loading...setup-intent/python/create-payment-intent.pyloading...setup-intent/cs/create-payment-intent.csloading...Once you create a payment intent to charge the card, the setup intent status is still ⦿ authorized.
-
Then initiate a charge to complete the process:
POST /payment-intents/{paymentIntentId}/charge
In your request, include:
paymentIntentId: This identifies the payment intent to be charged.Request example
The following code sample demonstrates initiating a charge of 10.00 GBP against the payment intent ID created in the above step:
- cURL
- PowerShell
- Python
- C#
setup-intent/curl/charge-card.shloading...setup-intent/powershell/charge-card.ps1loading...setup-intent/python/charge-card.pyloading...setup-intent/cs/charge-card.csloading...Once you charge the card successfully, the setup intent status is updated to ⦿ completed.
Check setup intent status
GET /setup-intents/{setupIntentId}
Every time you perform an action with the Setup IntentAPI, it transitions through a state. We recommend that you subscribe to notifications to check the current status of your setup intent.
In your request, include:
setupIntentId: identifies the setup intent you want to track.
For the full API specification, see the API reference.
Request example
The following example shows how to check the status of the setup intent:
- cURL
- PowerShell
- Python
- C#
loading...
loading...
loading...
loading...
The response will return information about the setup intent and its status.