Step-by-step guide
Learn how to create a setup intent and charge the card using the API.
During its lifecycle, the Setup Intent goes through a combination of the following statuses, depending upon your requirements.
| Status | Description |
|---|---|
Created | The setup intent is created. |
Authorized | The customer adds their card details and authorizes the setup intent. |
Expired | The setup intent expired after creation. |
CardExpired | The card entered has passed the expiry date and is no longer usable. |
Canceled | The setup intent in created state is deleted. |
Completed | The setup intent cycle is complete and the merchant has charged the customer's card. |
Closed | The authorized setup intent is also deleted. This is applicable when you set includeAuthorized to true using the DELETE /setup-intents endpoint. |
Flow diagram
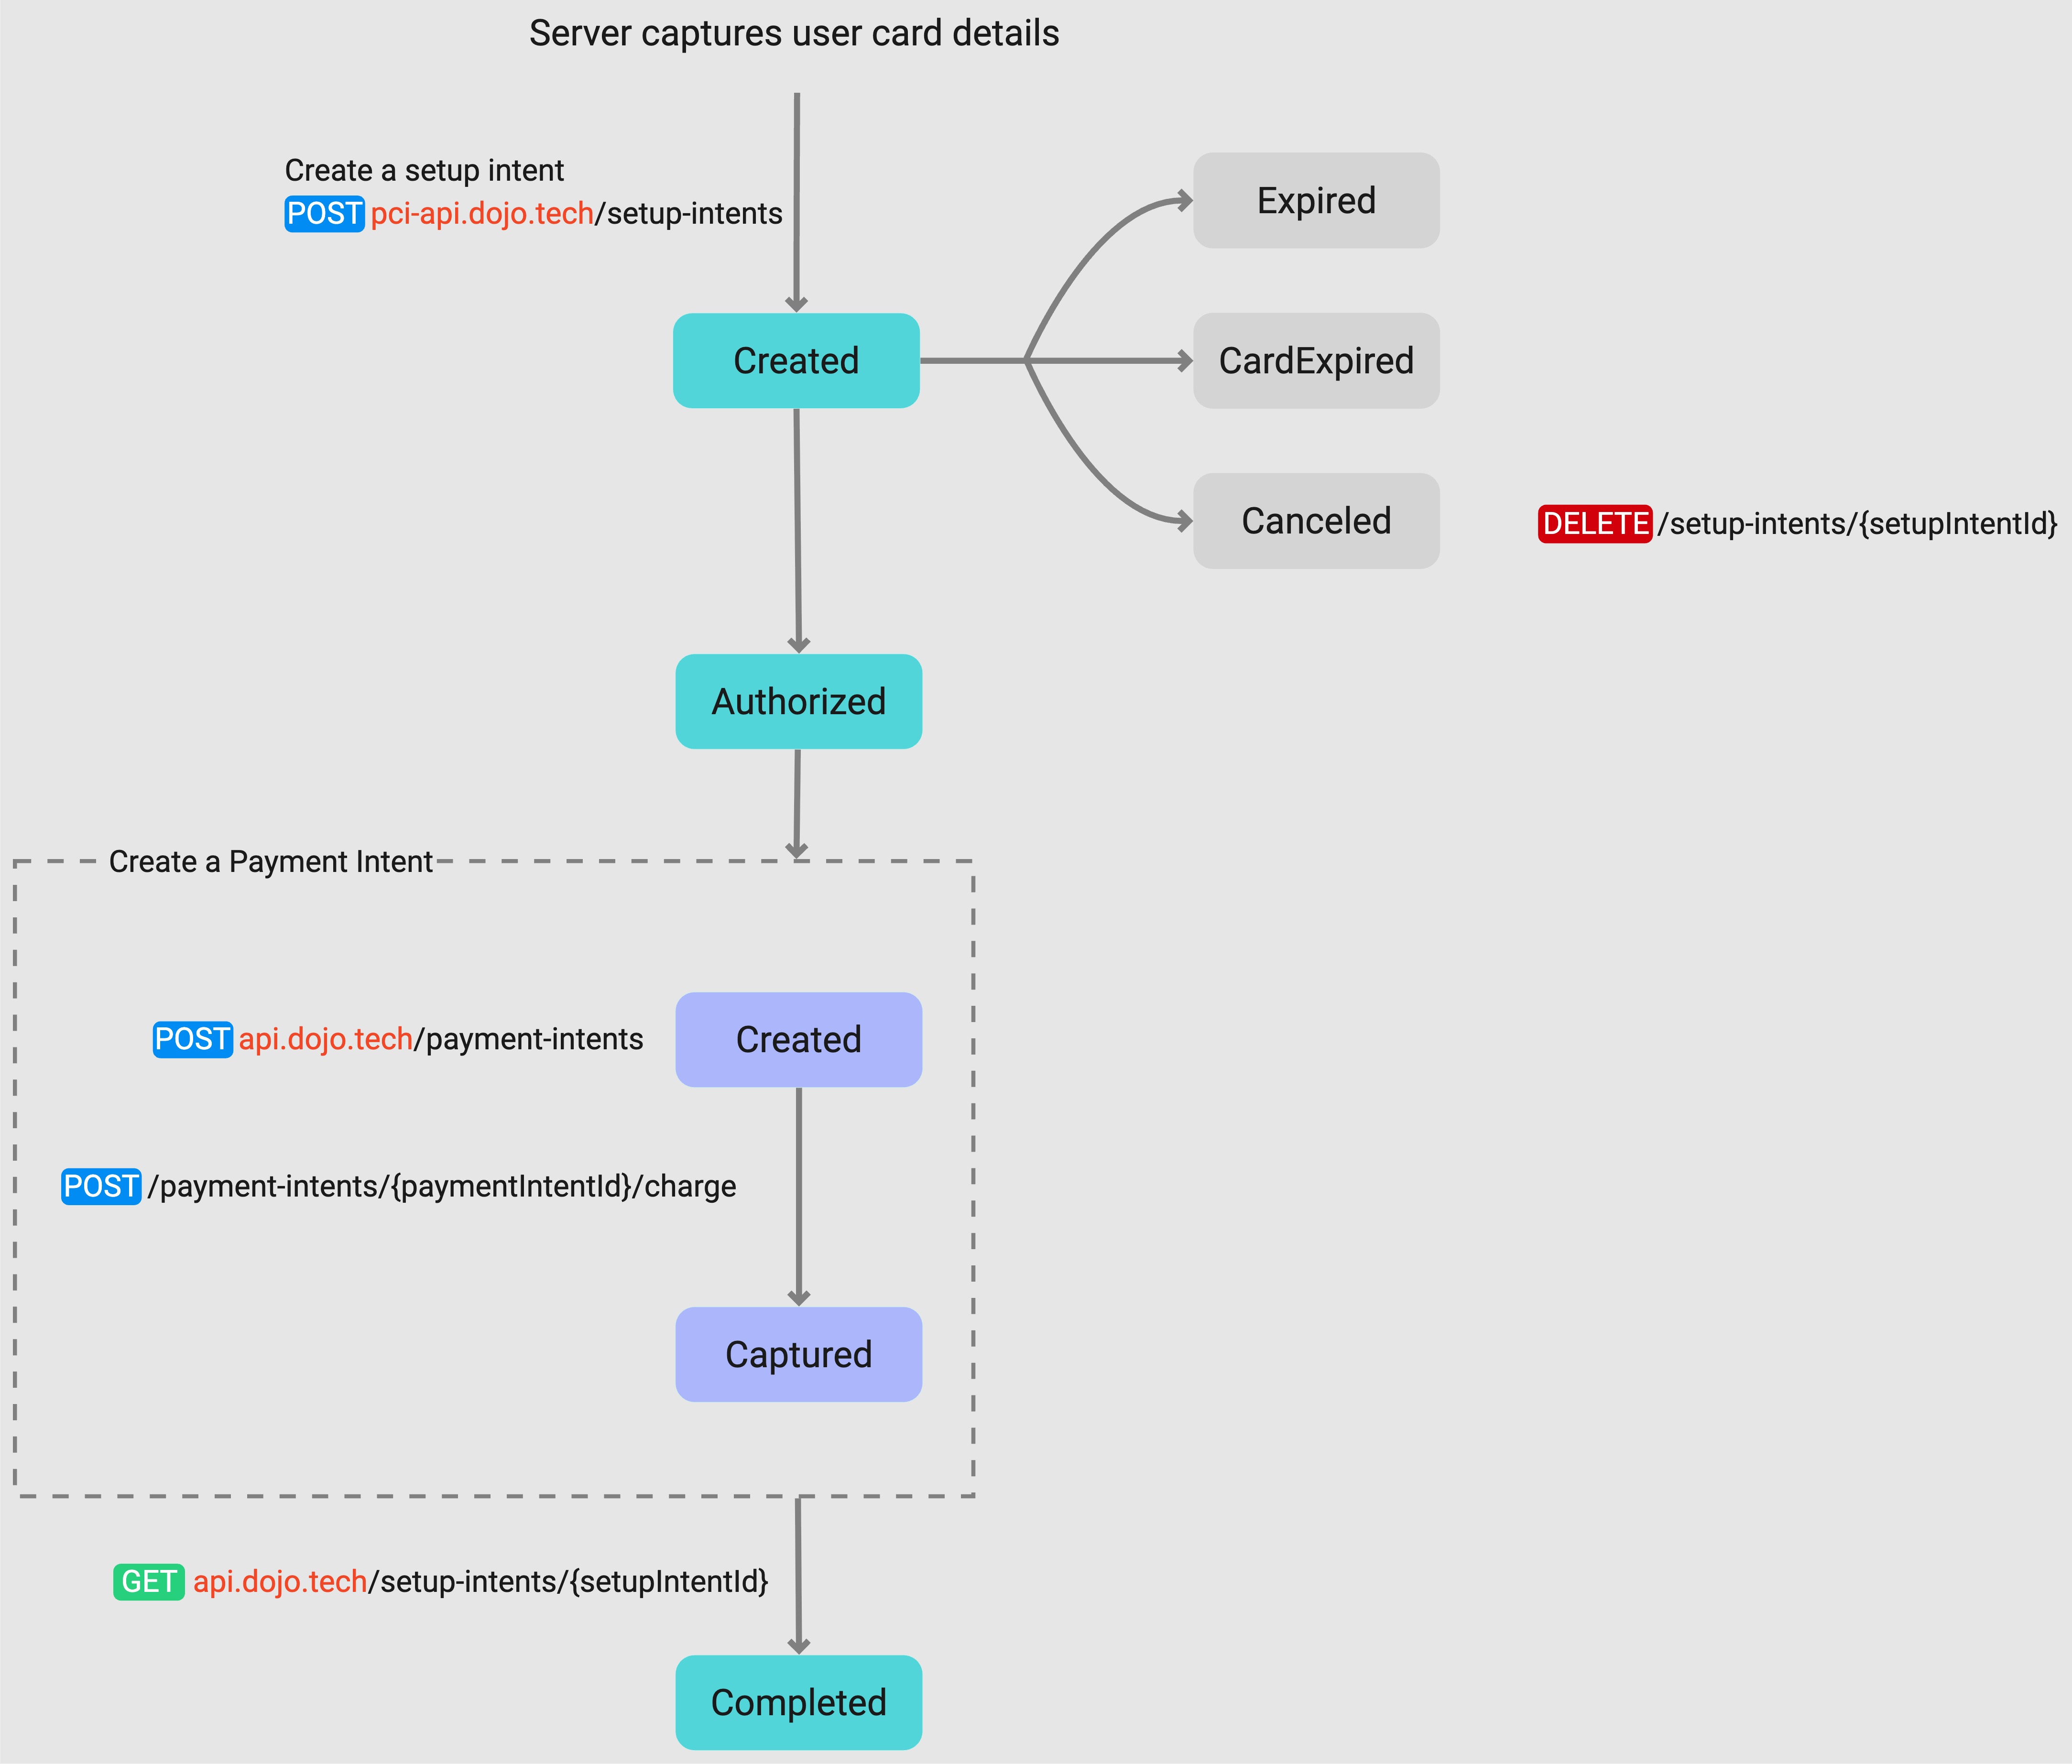
Flow diagram: Tokenization Flow
stateDiagram-v2
    direction TB

    state "Created" as SetupCreated
    state "Authorized" as Authorized
    state "Completed" as Completed

    [*] --> SetupCreated: Create a setup intent<br/>POST pci-api.dojo.tech/setup-intents

    SetupCreated --> Expired
    SetupCreated --> CardExpired
    SetupCreated --> Canceled: DELETE /setup-intents/{setupIntentId}

    SetupCreated --> Authorized

    state "Create a Payment Intent" as PI_Box {
        state "Created" as PICreated
        state "Captured" as PICaptured

        PICreated --> PICaptured: POST /payment-intents/{paymentIntentId}/charge
    }

    Authorized --> PICreated: POST api.dojo.tech/payment-intents
    PICaptured --> Completed: GET api.dojo.tech/setup-intents/{setupIntentId}

    %% Styling
    style SetupCreated fill:#40E0D0,stroke:#333
    style Authorized fill:#40E0D0,stroke:#333
    style Completed fill:#40E0D0,stroke:#333
    style PICreated fill:#A4B0F5,stroke:#333
    style PICaptured fill:#A4B0F5,stroke:#333
Step 1: Capture customer card details
Firstly, the customer's card details must be entered, such as into an i-frame, and securely captured by the client server.
In order to handle and store cardholder data, you will need to be able to provide evidence of attestation for PCI DSS SAQ-D, indicating that you are compliant with industry requirements with regard to the safe handling of this data.
A certificate of compliance must be provided to Dojo annually for continued useage of our tokenization services.
Step 2: Create a setup intent and authorize the card
To authorize and tokenize the captured cardholder data for a future payment, you must create a setup intent via a POST to the unique URL and endpoint below:
POST pci-api.dojo.tech/setup-intents
The creation of the initial setup intent for tokenization is the only instance in which the pci-api.dojo.tech URL is invoked. Follow-up setup intent calls referencing the created intent must be made to api.dojo.tech.
Dojo will attempt to authorize against the card details provided and then respond by confirming in the response body the details of the setup intent and attempted authorization, such as the status, time of creation and an id to be referenced in future calls. If the returned status is "Authorized", the card can then be charged by creating a payment intent.
Once you've created a setup intent, the status is updated to ⦿ created.
Step 3: Create a payment intent and charge the card
After a setup intent has been created and authorized, you can use the setupIntentId (created in step 2) to create a payment intent and charge the card. When you are ready to charge the card, create a payment intent and then use the payment intent charge endpoint.
- You can charge the full amount only.
- You can only charge a card once.
Charge a card using the Dojo API
To complete the process of charging a card, ensure you do the following:
-
Create a payment intent and pass the
setupIntentIdto the request.POST /payment-intents
{ ...
   "setupIntentId": "si_sandbox_<secret-key>",
}
Request example
The following code sample demonstrates creating a payment intent of 10.00 GBP using the setup intent ID:
- cURL
- PowerShell
- Python
- C#
# The sandbox API key passed in 'authorization' is public.
# Don't submit any personally identifiable information in any requests made with this key.
# Sign in to developer.dojo.tech to create your own private sandbox key and use that instead
# for secure testing.

curl -v --request POST \
    --url 'https://api.dojo.tech/payment-intents' \
    --header 'Content-Type: application/json' \
    --header 'Authorization: Basic sk_sandbox_c8oLGaI__msxsXbpBDpdtwJEz_eIhfQoKHmedqgZPCdBx59zpKZLSk8OPLT0cZolbeuYJSBvzDVVsYvtpo5RkQ' \
    --header 'Version: 2024-02-05' \
    --data '{
        "amount": {
            "value": 1000,
            "currencyCode": "GBP"
        },
        "reference": "Dojo Cafe | Table no. 4.",
        "setupIntentId": "<setupIntentId>"
    }'
# The sandbox API key passed in '$publicSandboxKey' is public.
# Don't submit any personally identifiable information in any requests made with this key.
# Sign in to developer.dojo.tech to create your own private sandbox key and use that instead
# for secure testing.
$publicSandboxKey = "sk_sandbox_c8oLGaI__msxsXbpBDpdtwJEz_eIhfQoKHmedqgZPCdBx59zpKZLSk8OPLT0cZolbeuYJSBvzDVVsYvtpo5RkQ"
Invoke-WebRequest `
-Uri 'https://api.dojo.tech/payment-intents' `
-Method POST `
-Headers @{
"Version" = "2024-02-05"
"Authorization" = "Basic $publicSandboxKey"
} `
-ContentType 'application/json' `
-Body '{
"amount": {
"value": 1000,
"currencyCode": "GBP"
},
"reference": "Dojo Cafe | Table no. 4.",
"setupIntentId": "<setupIntentId>"
}'# The sandbox API key passed in 'authorization' is public.
# Don't submit any personally identifiable information in any requests made with this key.
# Sign in to developer.dojo.tech to create your own private sandbox key and use that instead
# for secure testing.
import http.client
import json
conn = http.client.HTTPSConnection("api.dojo.tech")
payload = json.dumps({
"amount": {
"value": 1000,
"currencyCode": "GBP"
},
"reference": "Dojo Cafe | Table no. 4.",
"setupIntentId": "<setupIntentId>"
})
headers = {
'Content-Type': "application/json",
'Version': "2024-02-05",
'Authorization': "Basic sk_sandbox_c8oLGaI__msxsXbpBDpdtwJEz_eIhfQoKHmedqgZPCdBx59zpKZLSk8OPLT0cZolbeuYJSBvzDVVsYvtpo5RkQ" # <-- Change to your secret key
}
conn.request("POST", "/payment-intents", payload, headers)
res = conn.getresponse()
data = res.read()
print(data.decode("utf-8"))
conn.close()// The sandbox API key passed in 'ApiKeyClientAuthorization' is public.
// Don't submit any personally identifiable information in any requests made with this key.
// Sign in to developer.dojo.tech to create your own private sandbox key and use that instead
// for secure testing.
var paymentIntentsClient = new PaymentIntentsClient(new HttpClient(), new ApiKeyClientAuthorization("sk_sandbox_c8oLGaI__msxsXbpBDpdtwJEz_eIhfQoKHmedqgZPCdBx59zpKZLSk8OPLT0cZolbeuYJSBvzDVVsYvtpo5RkQ"));
var result = await paymentIntentsClient.CreatePaymentIntentAsync(new CreatePaymentIntentRequest
{
Amount = new()
{
Value = 1000,
CurrencyCode = "GBP"
},
Reference = "Dojo Cafe | Table no.4.",
SetupIntentId = "<setupIntentId>",
});Once you create a payment intent to charge the card, the setup intent status is still ⦿ authorized.
-
Initiate a charge to complete the process:
POST /payment-intents/{paymentIntentId}/charge
In your request, include:
paymentIntentId: This identifies the payment intent to be charged.Request example
The following code sample demonstrates initiating a charge of 10.00 GBP against the payment intent ID created in the above step:
- cURL
- PowerShell
- Python
- C#
# The sandbox API key passed in 'authorization' is public.
# Don’t submit any personally identifiable information in any requests made with this key.
# Sign in to developer.dojo.tech to create your own private sandbox key and use that instead
# for secure testing.

curl -v --request POST \
    --url https://api.dojo.tech/payment-intents/pi_sandbox_Dcqx7k8pUUKedgB6wD1J1A/charge \
    --header 'Content-Type: application/json' \
    --header 'Authorization: Basic sk_sandbox_c8oLGaI__msxsXbpBDpdtwJEz_eIhfQoKHmedqgZPCdBx59zpKZLSk8OPLT0cZolbeuYJSBvzDVVsYvtpo5RkQ' \
    --header 'Version: 2024-02-05'
# The sandbox API key passed in '$publicSandboxKey' is public.
# Don't submit any personally identifiable information in any requests made with this key.
# Sign in to developer.dojo.tech to create your own private sandbox key and use that instead
# for secure testing.
$publicSandboxKey = "sk_sandbox_c8oLGaI__msxsXbpBDpdtwJEz_eIhfQoKHmedqgZPCdBx59zpKZLSk8OPLT0cZolbeuYJSBvzDVVsYvtpo5RkQ"
Invoke-WebRequest `
-Uri 'https://api.dojo.tech/payment-intents/pi_sandbox_Dcqx7k8pUUKedgB6wD1J1A/charge' `
-Method POST `
-Headers @{
"Version" = "2024-02-05"
"Authorization" = "Basic $publicSandboxKey"
}# The sandbox API key passed in 'authorization' is public.
# Don't submit any personally identifiable information in any requests made with this key.
# Sign in to developer.dojo.tech to create your own private sandbox key and use that instead
# for secure testing.
import http.client
conn = http.client.HTTPSConnection("api.dojo.tech")
headers = {
'Version': "2024-02-05",
'Authorization': "Basic sk_sandbox_c8oLGaI__msxsXbpBDpdtwJEz_eIhfQoKHmedqgZPCdBx59zpKZLSk8OPLT0cZolbeuYJSBvzDVVsYvtpo5RkQ"
}
conn.request("POST", f"/payment-intents/pi_sandbox_Dcqx7k8pUUKedgB6wD1J1A/charge", headers=headers)
res = conn.getresponse()
data = res.read()
print(data.decode("utf-8"))
conn.close()// The sandbox API key passed in 'ApiKeyClientAuthorization' is public.
// Don't submit any personally identifiable information in any requests made with this key.
// Sign in to developer.dojo.tech to create your own private sandbox key and use that instead
// for secure testing.
var chargeResponse = new PaymentIntentsClient(new HttpClient(), new ApiKeyClientAuthorization("sk_sandbox_c8oLGaI__msxsXbpBDpdtwJEz_eIhfQoKHmedqgZPCdBx59zpKZLSk8OPLT0cZolbeuYJSBvzDVVsYvtpo5RkQ"));
var result = await chargeResponse.ChargePaymentIntentAsync("pi_sandbox_Dcqx7k8pUUKedgB6wD1J1A");Once you charge the card successfully, the setup intent status is updated to ⦿ completed.
Step 4: Check setup intent status
GET /setup-intents/{setupIntentId}
Every time you perform an action with the Setup IntentAPI, it transitions through a state. We recommend that you subscribe to notifications to check the current status of your setup intent.
In your request, include:
setupIntentId: identifies the setup intent you want to track.
For the full API specification, see the API reference.
Request example
The following example shows how to check the status of the setup intent:
- cURL
- PowerShell
- Python
- C#
# The sandbox API key passed in 'authorization' is public.
# Don't submit any personally identifiable information in any requests made with this key.
# Sign in to developer.dojo.tech to create your own private sandbox key and use that instead
# for secure testing.

curl -v --request POST \
    --url 'https://api.dojo.tech/setup-intents/si_sandbox_Oh69aQaQMUuNIPJcPrcRwQ' \
    --header 'Content-Type: application/json' \
    --header 'Authorization: Basic sk_sandbox_c8oLGaI__msxsXbpBDpdtwJEz_eIhfQoKHmedqgZPCdBx59zpKZLSk8OPLT0cZolbeuYJSBvzDVVsYvtpo5RkQ' \
    --header 'Version: 2024-02-05'
# The sandbox API key passed in '$publicSandboxKey' is public.
# Don't submit any personally identifiable information in any requests made with this key.
# Sign in to developer.dojo.tech to create your own private sandbox key and use that instead
# for secure testing.

$publicSandboxKey = "sk_sandbox_c8oLGaI__msxsXbpBDpdtwJEz_eIhfQoKHmedqgZPCdBx59zpKZLSk8OPLT0cZolbeuYJSBvzDVVsYvtpo5RkQ"

# Replace <PAYMENT_INTENT_ID> with ID of payment intent you want to cancel.
Invoke-WebRequest `
    -Uri 'https://api.dojo.tech/setup-intents/<PAYMENT_INTENT_ID>' `
    -Method GET `
    -Headers @{
        "Version" = "2024-02-05"
        "Authorization" = "Basic $publicSandboxKey"
    }
# The sandbox API key passed in 'authorization' is public.
# Don't submit any personally identifiable information in any requests made with this key.
# Sign in to developer.dojo.tech to create your own private sandbox key and use that instead
# for secure testing.

import http.client
import json

conn = http.client.HTTPSConnection("api.dojo.tech")

headers = {
    'Version': "2024-02-05",
    'Authorization': "Basic sk_sandbox_c8oLGaI__msxsXbpBDpdtwJEz_eIhfQoKHmedqgZPCdBx59zpKZLSk8OPLT0cZolbeuYJSBvzDVVsYvtpo5RkQ"
    }

conn.request("GET", f"/setup-intents/{setupIntentId}", headers=headers)

res = conn.getresponse()
data = res.read()
resp_data = {}
resp_data['status'] = json.loads(data)["status"]

print(resp_data)

conn.close()
// The sandbox API key passed in 'ApiKeyClientAuthorization' is public.
// Don't submit any personally identifiable information in any requests made with this key.
// Sign in to developer.dojo.tech to create your own private sandbox key and use that instead
// for secure testing.

var setupIntentsClient = new SetupIntentsClient(new HttpClient(), new ApiKeyClientAuthorization("sk_sandbox_c8oLGaI__msxsXbpBDpdtwJEz_eIhfQoKHmedqgZPCdBx59zpKZLSk8OPLT0cZolbeuYJSBvzDVVsYvtpo5RkQ"));
var result = await setupIntentsClient.GetByIdAsync("<Setup intent ID>");
Console.WriteLine(result.Status);
The response will return information about the setup intent and its status.